Your Kubernetes clusters are up and running on vSphere 7 with Tanzu and you can’t wait to get started on your first project. But before you get to that, you might want to enable the Harbor registry so that you can privately store your own container images and use them with your clusters. Luckily, in vSphere 7 with Tanzu, the Harbor project has been integrated into the solution. You just have to turn it on and set it up.
NOTE: This article takes advantage of the updates in vSphere 7 U1c. Prior to the C release, the kubernetes clusters didn’t automatically trust the harbor certificate. It’s still possible to use it, but takes additional configuration.
If you’re not familiar with what a container image registry is, in simple terms, its where you store your container images after you’ve built them. A very common and public registry is docker hub. Its pretty common to grab some public images like ubuntu, nginx, alpine, redis, etc right off of docker hub. You should, however, take care when using container images from a public repo because you aren’t really sure what code has been put into that container. Perhaps it is malicious. This is where a private image registry comes in. Place your containers with your corporate logic in these private registries, hopefully with high bandwidth connections to your clusters for faster downloads.
Enable the Registry
Before you enable the harbor registry, you’ll need to have a vSphere 7 with Tanzu Supervisor cluster deployed. This series will help if you haven’t done this already.
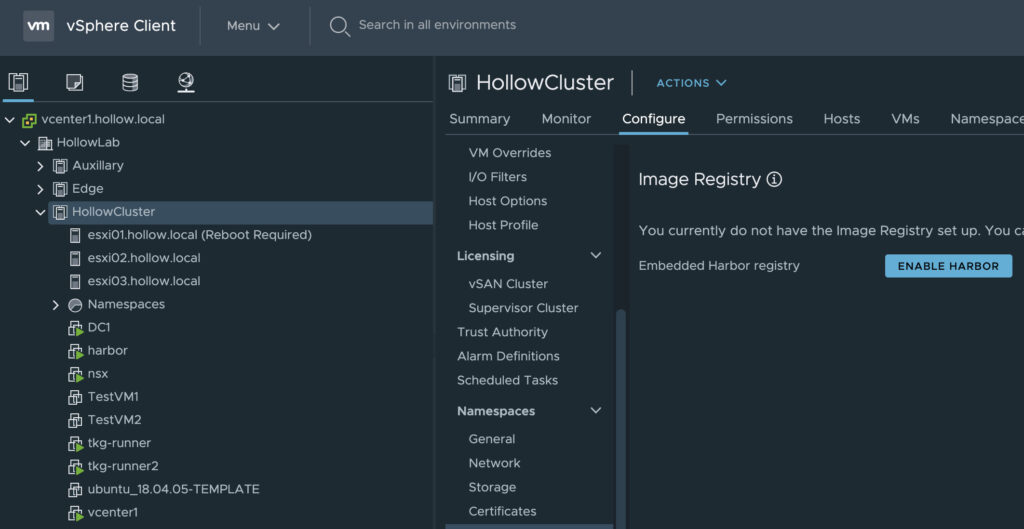
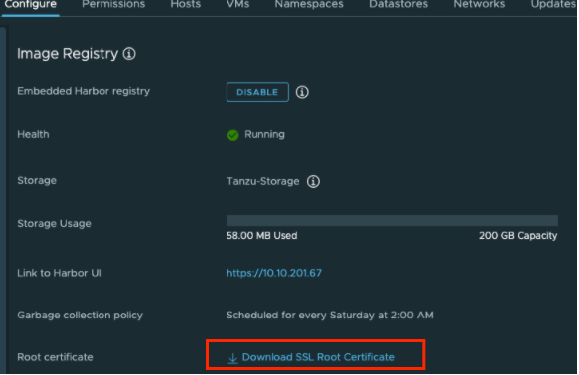
To enable the Harbor Registry, select the vSphere Virtual Machine cluster running your Supervisor cluster. Under the configure tab select Image Registry and click Enable Harbor.
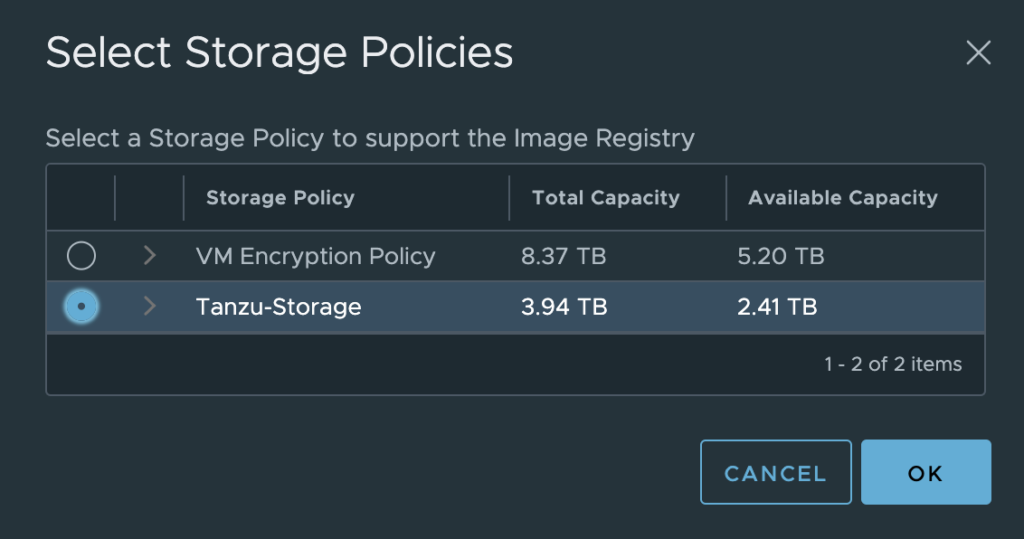
After you do this, you’ll need to specify a storage policy to decide what datastore the Harbor registry service will live within. Select your storage policy and click OK.
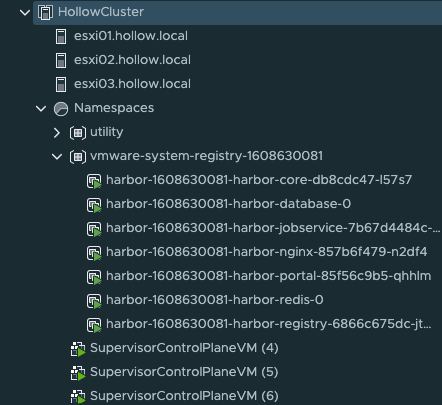
That was pretty easy huh? Well your next step is to wait for the registry to be enabled fully. If you’ve logged in as the [email protected] user, you’ll probably see some new virtual machines being deployed in your cluster. Otherwise, these may be hidden from you.
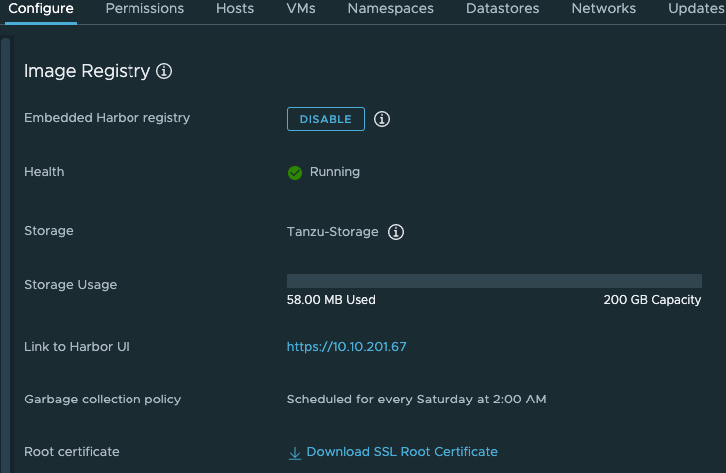
Also, when Harbor has been deployed, you’ll get some information in the configure tab that shows the URL and the storage space used for the harbor registry.
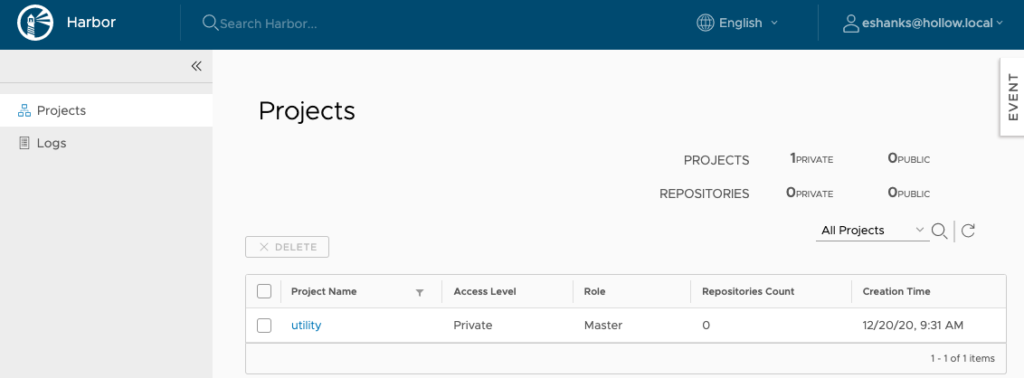
You can click the link to the Harbor UI and login with your vSphere credentials. You’ll notice that in my instance, there is already a project named utility. Thats because I have a namespace in my supervisor cluster called utility. You’ll have one project for each namespace within the supervisor cluster.
Use Harbor with Supervisor Cluster
At this point we could start using the harbor registry for our supervisor cluster. I’ve already got a container image on my local workstation that I’ve built and plan to push it to our new harbor registry.
Before we can push anything, we need to login to the harbor registry from our workstation with a docker login command. Then login with your vSphere credentials.

NOTE: If you don’t have the root certificate installed, you won’t be able to login with this method. To install the root certificiate, you can download the certificate from the harbor configuration page. You’ll need to place that certificate into your trusted store on the client you’re using. For Mac OS you can run the following commands:
security add-trusted-cert -d -r trustRoot -k ~/Library/Keychains/login.keychain ca.crt
When done, you need to restart the docker service.
Once you’re logged into the registry, you can push your own image. In the screenshot below, I’ve tagged my image and pushed it to the repository.

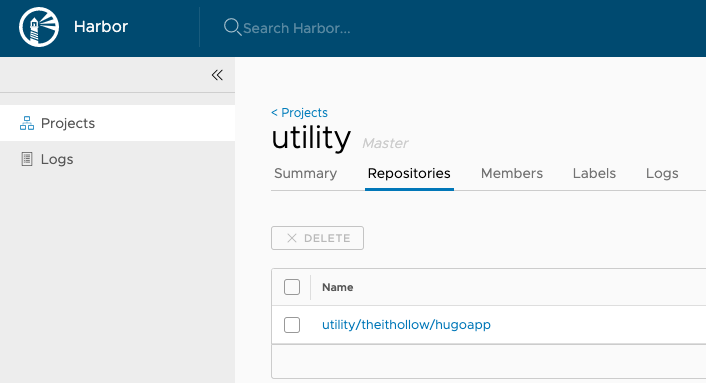
After its been pushed, you’ll see the repository listed under your namespace in the harbor UI.
And lastly, login to your supervisor cluster within the namespace configured, and try to pull down the image and run it. You can see the image was pulled to create a new PodVM in the Supervisor cluster.

Use Harbor with TKG Clusters
Our first example was neat, but many customers won’t run pods directly on the Supervisor cluster. If you’re building Tanzu Kubernetes Grid Clusters (referred to as TKCs, guest clusters or child clusters) you will need to take a couple of extra steps. Namely, you’ll need to obtain and deploy an image pull secret for the harbor registry on any of the child clusters.
To obtain the image pull secret, login to the Supervisor namespace.
kubectl get secret -n [vsphere-namespace] [namespace]-default-image-pull-secret -o yaml > registrysecret.yaml
Edit that YAML file to remove the namespace entry. You’ll deploy this secret into the TKC namespace that will be pulling images. In my example that is the default namespace so I’ve removed the namespace: utility entry in my registrysecret.yaml file.
Next, login to your TKC cluster that was deployed within the same supervisor namespace and apply the secret.
kubectl apply -f registrysecret.yaml
Once your secret has been deployed to the Tanzu Kubernetes Cluster [Child/Workload Cluster] you can add that image pull secret to your YAML manifests to start using the harbor registry for your containers.
...
spec:
  containers:
  - name: private-reg-container
    image:
  imagePullSecrets:
  - name: [registrysecretname]
...
Summary
Now that the vSphere 7.0 U1c patch has been released, you can start using the embedded Harbor registry with both your Supervisor Cluster as well as any Tanzu Kubernetes Clusters you may have provisioned. You can securely store your images here which will be very close to your workload clusters so you can expect quick downloads when new images are called for by your Kubernetes pods.