In a previous post we covered the use of pods and deployed some “naked pods” in our Kubernetes cluster. In this post we’ll expand our use of pods with Replica Sets.
Replica Sets - The Theory
One of the biggest reasons that we don’t deploy naked pods in production is that they are not trustworthy. By this I mean that we can’t count on them to always be running. Kubernetes doesn’t ensure that a pod will continue running if it crashes. A pod could die for all kinds of reasons such as a node that it was running on had failed, it ran out of resources, it was stopped for some reason, etc. If the pod dies, it stays dead until someone fixes it which is not ideal, but with containers we should expect them to be short lived anyway, so let’s plan for it.
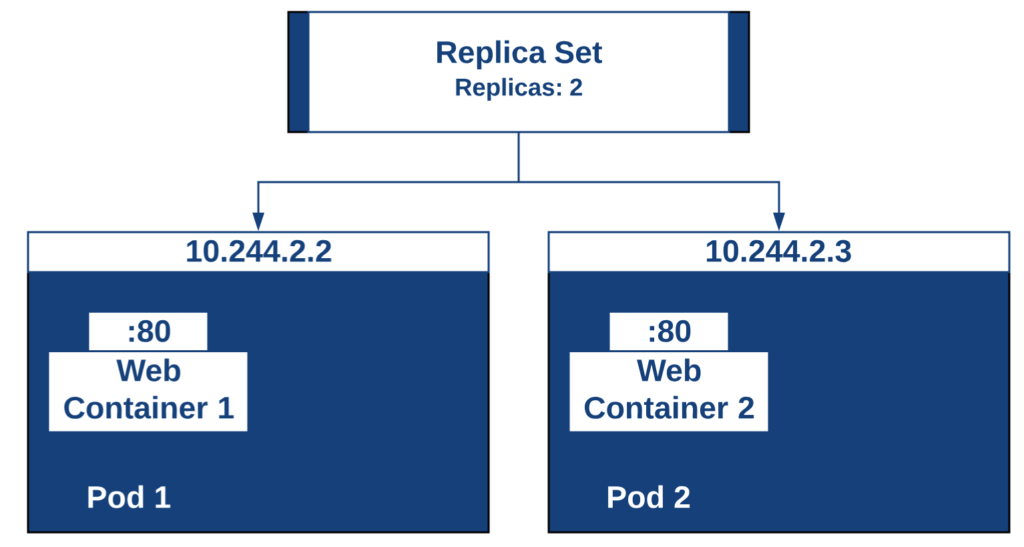
Replica Sets are a level above pods that ensures a certain number of pods are always running. A Replica Set allows you to define the number of pods that need to be running at all times and this number could be “1”. If a pod crashes, it will be recreated to get back to the desired state. For this reason, replica sets are preferred over a naked pod because they provide some high availability.
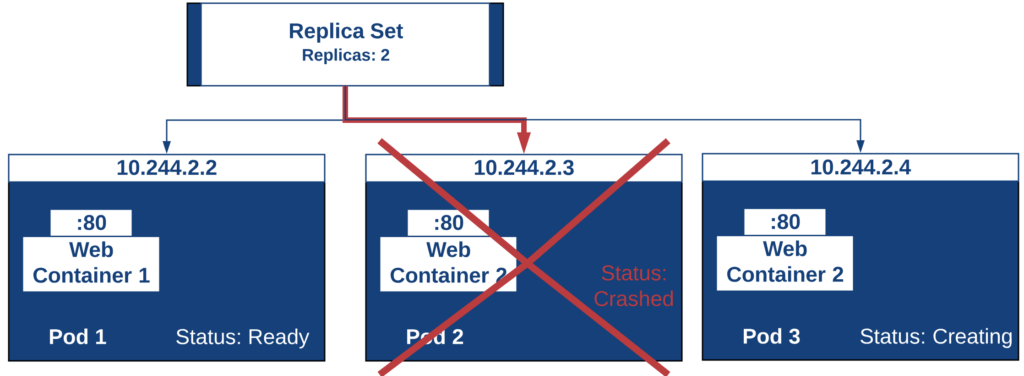
If one of the pods thats is part of a replica set crashes, one will be created to take its place.
Replica Sets - In Action
Let’s deploy a Replica Set from a manifest file so we can see what happens during the deployment. First, we’ll need a manifest file to deploy. The manifest below will deploy nginx just like we did with the pods, except this time we’ll use a Replica Set and specify that we should always have 2 replicas running in our cluster.
apiVersion: apps/v1 #version of the API to use
kind: ReplicaSet #What kind of object we're deploying
metadata: #information about our object we're deploying
  name: nginx-replicaset
spec: #specifications for our object
  replicas: 2 #The number of pods that should always be running
  selector: #which pods the replica set should be responsible for
    matchLabels:
      app: nginx #any pods with labels matching this I'm responsible for.
  template: #The pod template that gets deployed
    metadata:
      labels: #A tag on the pods created
        app: nginx
    spec:
      containers:
      - name: nginx-container #the name of the container within the pod
        image: nginx #which container image should be pulled
        ports:
        - containerPort: 80 #the port of the container within the pod
Let’s deploy the Replica Sets from the manifest file by running a kubectl command and then afterwards we’ll run a command to list our pods.
kubectl apply -f [manifest file].yml
kubectl get pods
As you can see from my screenshot, we now have two pods running as we were expecting. Note: if you run the command too quickly, the pods might still be in a creating state. If this happens wait a second and run the get pod command again.

I wonder what would happen if we manually deleted one of those pods that was in the Replica Set? Let’s try it by running:
kubectl delete pod [pod name]
Run another “get pod” command quickly to see what happens after you delete one of your pods.

As you can see from my screenshot, I deleted a pod and then immediately ran another get pods command. You can see that one of my pods is in a Terminating status, but there is a new pod that is now running and thats because our Replica Set specified that two pods should be available. It is ensuring that we have that many at all times, even if one fails.
Summary
Now you know the basics of Replica Sets and why you’d use them over naked pods. Again, don’t worry that you can’t access your nginx container yet, we still haven’t gotten to that yet but we’re getting there. We’re going to learn a few more things before this happens but we’re well on our way now.
If you’re done with your testing you can remove the Replica Set we created by running:
kubectl delete -f [mainfest file].yml