We’ve got a Kubernetes cluster setup and we’re ready to start deploying some applications. Before we can deploy any of our containers in a kubernetes environment, we’ll need to understand a little bit about pods.
Pods - The Theory
In a docker environment, the smallest unit you’d deal with is a container. In the Kubernetes world, you’ll work with a pod and a pod consists of one or more containers. You cannot deploy a bare container in Kubernetes without it being deployed within a pod.
The pod provides several things to the containers running within it. These include options on how the container should run, any storage resources and a network namespace. The pod encapsulates these for the containers that run inside them.
Single Container Pods
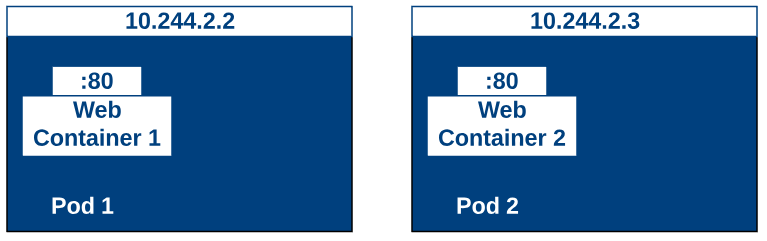
The simplest way to get your containers deployed in Kubernetes is the one container per pod approach. When you deploy your applications and you’ve got a web container and an app container, each of them could be in their own pods. When you need to scale out either the web or app containers, you would then deploy additional pods.
Multi-container Pods
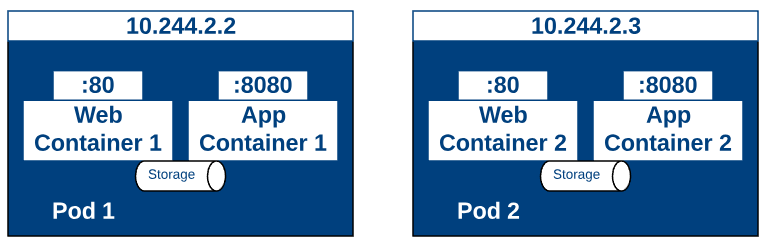
Sometimes you’ll want to deploy more than one container per pod. In general, this is done when the containers are very tightly coupled. One good reason to do this is if the containers are sharing the same storage resource between the two containers. If they are, this is a good time to use a multi-container pod. Another common reason to use multi-container pods is for things like a service mesh where a sidecar container is deployed alongside your application containers to link them together.
It is important to note however, that all containers that run within a pod will share an network namespace so this means that the containers are sharing an IP address and thus will need to be on different ports for them to be accessed. Containers within the same pod may access each other by using the localhost address.
It’s also worth noting that a pod will have all containers up or none of them. Your pods will not be considered healthy until all containers that run within them are ready to go, so you can’t have one healthy container and one unhealthy container in the same pod. The pod deployment will fail if this happens.
Those are the pod basics. Next up, let’s look at how to deploy a container within a pod.
Pods - In Action
Before we dive too far into this, you should know that this section shows some basics about deploying your first pods in a Kubernetes cluster, but these are considered “naked pods” and should be avoided in production. This section is to get you comfortable first. In a later post we’ll discuss how to use pods with ReplicaSets or Deployments to make your pods more highly available and more useful.
I also want to mention that there are two ways to deploy objects in Kubernetes. The first way is through the command line and the second is through a manifest file. You will likely spend time in both of them where the manifest file is your configuration stored in version control and the command line would be used for troubleshooting purposes. The focus for this blog post will be on the manifests files.
Deploy an Nginx pod from Manifest
To deploy nginx we first need to create a manifest file in YAML format. The code below will deploy our naked nginx container on our Kubernetes cluster. The file has comments for important lines so that you can see what each piece accomplishes.
apiVersion: v1 #version of the API to use
kind: Pod #What kind of object we're deploying
metadata: #information about our object we're deploying
  name: nginx-pod
spec: #specifications for our object
  containers:
  - name: nginx-container #the name of the container within the pod
    image: nginx #which container image should be pulled
    ports:
    - containerPort: 80 #the port of the container within the pod
Save the file and then we’ll deploy it by running the following command from our cli:
kubectl apply -f [manifest file].yml
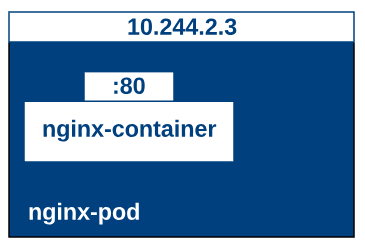
Once deployed we should have a pod environment that looks similar to this although the IP address is likely different from mine.
To check on our pods, we can run:
kubectl get pods

To get even more details on the pod that was deployed, we can run:
kubectl describe pod [pod name]
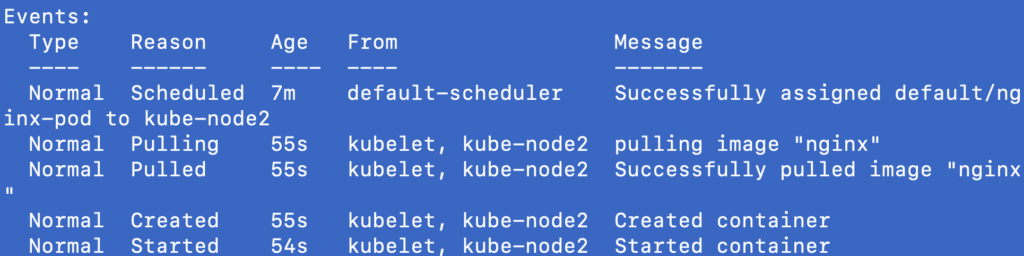
The screenshot below omits a lot of the data (because it was difficult to fit on this page mainly) but it does show the events for the pod listed at the bottom. When you run this on your own you should see a wealth of knowledge about the pod.
Summary
That’s it for pods. I should note that you probably can’t connect to your container. Don’t worry, you’re not supposed to be able to yet. We’ll continue this conversation in a future post where we learn about other objects including Deployments, ReplicaSets and Services.
If you’re all done, you can delete your pod from your cluster by running:
kubectl delete -f [mainfest file].yml