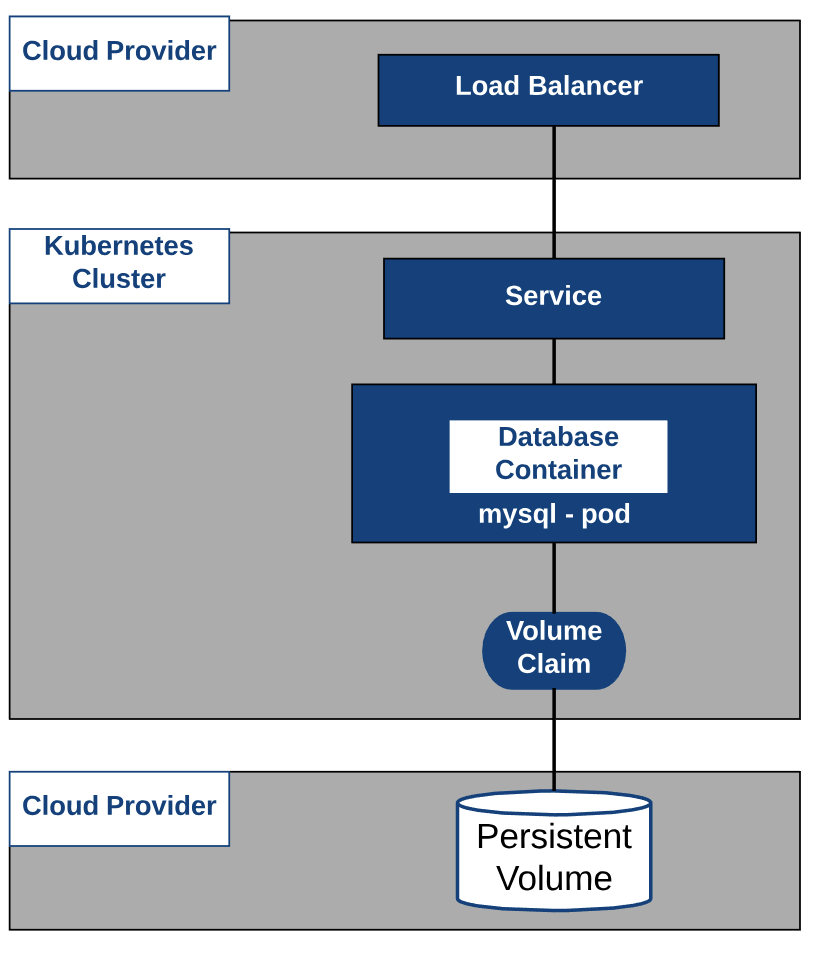
In the previous post we covered Persistent Volumes (PV) and how we can use those volumes to store data that shouldn’t be deleted if a container is removed. The big problem with that post is that we have to manually create the volumes and persistent volume claims. It would sure be nice to have those volumes spun up automatically wouldn’t it? Well, we can do that with a storage class. For a storage class to be really useful, we’ll have to tie our Kubernetes cluster in with our infrastructure provider like AWS, Azure or vSphere for example. This coordination is done through a cloud provider.
Cloud Providers - The Theory
As we’ve learned in some of our other posts within this series, there are some objects that you can deploy through the kubectl client that don’t exist inside the Kubernetes cluster. Things like a load balancer for example. If your k8s cluster is running on EC2 instances within AWS, you can have AWS deploy a load balancer that points to your ingress controller. When it comes to storage, we can take that a step further and request EBS volumes be attached to our Kubernetes cluster for our persistent volumes.
This configuration can all be controlled from the kubectl client, if you setup a cloud provider. Later in this post we’ll see cloud providers in action when we setup our Cloud Provider for our vSphere environment. We won’t be able to use load balancers, but we will be able to use our vSphere storage.
Storage Classes - The Theory
Storage Classes are a nice way of giving yourself a template for the volumes that might need to be created in your Kubernetes cluster. Instead of creating a new PV for every pod, its much nicer to have a Storage Class that defines what a PV might look like. Then when the pods spin up with a persistent volume claim (PVC), it will create those PVs as they are needed from a template. Storage Classes are the mechanism that lets us deploy PVs from a template. In our Kubernetes cluster we’ve deployed PVs in a previous post, but we can’t do this with a storage class at this time because dynamic provisioning isn’t available yet. However, if we use a storage class connected with a Cloud Provider, we can use a storage class to automatically provision new vSphere storage for our cluster.
When we combine storage classes and Cloud Providers together, we can get some pretty neat results.
Cloud Provider - In Action
Before we can do much with our cloud provider, we need to set it up. I will be doing this on my vSphere hosted k8s cluster that was deployed in this previous post. To setup the cloud provider, I’ll be rebuilding this cluster with the kubeadm reset command to reset the cluster and then performing the kubeadm init process from scratch.
Sidebar: I had some help with this configuration and wanted to send a shout-out to Tim Carr who is a Kubernetes Architect at VMware as well as an all around good guy.
vSphere Setup
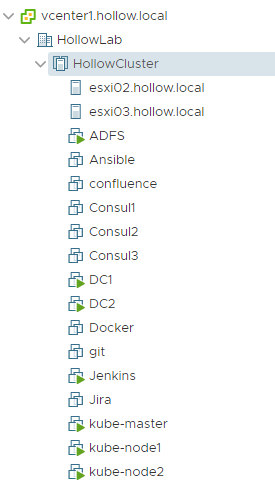
Before creating any Kubernetes configs, we need to make sure our vSphere environment is ready to be used by k8s. I’ve created an administrator accounts which permissions to the cluster, VMs, and datastores. Here is a look at my hosts and clusters view so you can see how I created config files later in the post.
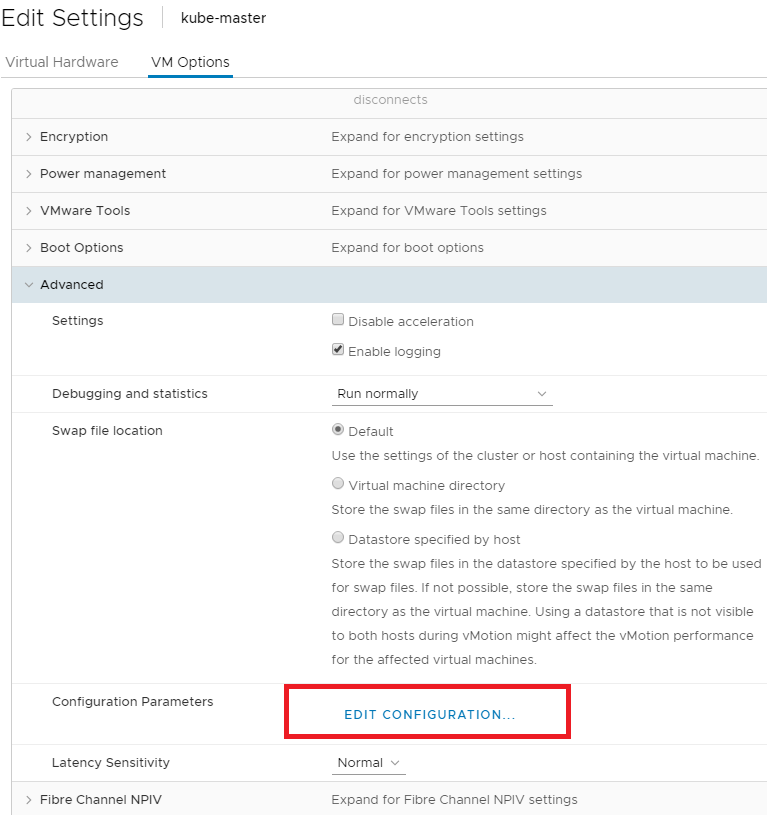
Now don’t go to far, you’ll need to make sure that an advanced configuration setting is added to your Kubernetes nodes. This setting ensures that Kubernetes can identify the disks that it might need to add to a pod from vSphere. To do this, power off your k8s cluster and modify the vm properties of the nodes. Go to VM Options and click the Edit Configurations link next to Configuration Parameters in the Advanced section.
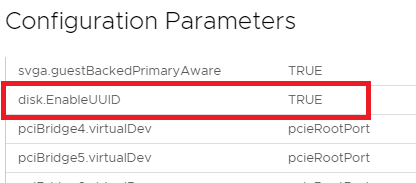
From there, add the key “disk.EnableUUID” and the corresponding value of “True”.
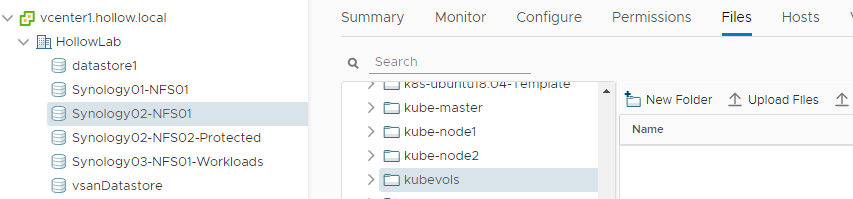
I’ve also created a folder called “kubevol” in one of my vSphere datastores where new Kubernetes persistent volumes will live.
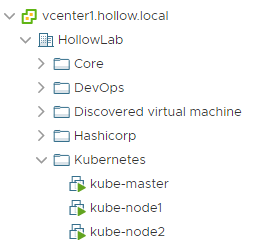
Lastly, all of my k8s nodes live within a single virtual machine folder, which is important.
Kubeadm init Setup
First, we need to create a config file that will have configuration information for the connection to the vSphere environment. It will include the location of the Kubernetes hosts, datastores and connection strings shown in the above screenshots. Here is the example file I used in my lab. I saved it as vsphere.conf for now and placed it in the /etc/kubernetes directory on my master node.
NOTE: It is possible to use a Base64 encoded password, which I didn’t do for this post. Just note that it can be done and should be used over plain text for any production environments. This is a getting stated post so we’ve eliminated some of the complexity here.
[Global]
user = "[email protected]"
password = "Password123"
port = "443"
insecure-flag = "1"
datacenters = "HollowLab"

[VirtualCenter "vcenter1.hollow.local"]

[Workspace]
server = "vcenter1.hollow.local"
datacenter = "HollowLab"
default-datastore="Synology02-NFS01"
resourcepool-path="HollowCluster/Resources"
folder = "Kubernetes"

[Disk]
scsicontrollertype = pvscsi
If you’re wondering what this config file contains, here are some descriptions of the fields.
- user - Username with admin access to the vSphere cluster to create storage
- password - The credentials for the user to login
- port - The port used to connect to the vCenter server
- insecure-flag - Setting this to “1” means it will accept the certificate if it isn’t trusted
- datacenters - The datacenter within vCenter where Kubernetes nodes live
- server - The vCenter to connect to
- default datastore - Datastore where persistent volumes will be created
- resourcepool-path - The resource pool where the Kubernetes nodes live.
- folder - the folder where your Kubernetes nodes live. They should be in their own folder within vSphere.
- scsicontrollertype - Which type of vSphere scsi controller type should be used
The config file you created in the previous step is the connection information for vSphere. However, when you run the Kubeadm init configuration, you need a configuration file that’s used to bootstrap your cluster.
We’ll need to create a yaml file that will be used during the kubeadm init process. Here is the config file for the kubeadm init. Note that the cloud provider is “vsphere” and and I’ve updated the cloud-config value to the path to the vsphere.conf file we just created in the previous step. I’ve placed both this config file and the vsphere.conf file in /etc/kubernetes/ directory on the k8s master.
apiVersion: kubeadm.k8s.io/v1beta1
kind: InitConfiguration
bootstrapTokens:
       - groups:
         - system:bootstrappers:kubeadm:default-node-token
         token: cba33r.3f565pcpa8vbxdpu #generate your own token here prior or use an autogenerated token
         ttl: 0s
         usages:
         - signing
         - authentication
nodeRegistration:
  kubeletExtraArgs:
    cloud-provider: "vsphere"
    cloud-config: "/etc/kubernetes/vsphere.conf"
---
apiVersion: kubeadm.k8s.io/v1beta1
kind: ClusterConfiguration
kubernetesVersion: v1.13.4
apiServer:
  extraArgs:
    cloud-provider: "vsphere"
    cloud-config: "/etc/kubernetes/vsphere.conf"
  extraVolumes:
  - name: cloud
    hostPath: "/etc/kubernetes/vsphere.conf"
    mountPath: "/etc/kubernetes/vsphere.conf"
controllerManager:
  extraArgs:
    cloud-provider: "vsphere"
    cloud-config: "/etc/kubernetes/vsphere.conf"
  extraVolumes:
  - name: cloud
    hostPath: "/etc/kubernetes/vsphere.conf"
    mountPath: "/etc/kubernetes/vsphere.conf"
networking:
  podSubnet: "10.244.0.0/16"

Now, we have the details for our Kubernetes cluster to be re-initialized with the additional connection information for our vSphere environment. Lets re-run the kubeadm init command now with our new configuration file.
kubeadm init --config /etc/kubernetes/[filename].yml

The result will be the setup of your Kubernetes cluster again on the master node. After this is done, we still need to have our other worker nodes join the cluster much like we did in the original kubeadm post. Before we do this though, we want to create another config file on the worker nodes so that they know they are joining a cluster and have the vSphere provider available to them. We will also need some information from the master node that will be passed along during the join. To get this information run:
kubectl -n kube-public get configmap cluster-info -o jsonpath='{.data.kubeconfig}' > config.yml
Take this config.yml file that was created on the master and place it on the k8s worker nodes. This discovery file provides information needed to join the workers to the cluster properly.
Create another yaml file in the /etc/kubernetes directory called vsphere-join.yml. This file should contain the join token presented at the last step of the kubeadm init provided earlier.
apiVersion: kubeadm.k8s.io/v1alpha3
kind: JoinConfiguration
discoveryFile: config.yml
token: cba33r.3f565pcpa8vbxdpu #token used to init the k8s cluster. Yours should be different
nodeRegistration:
  kubeletExtraArgs:
    cloud-provider: vsphere #cloud provider is enabled on worker
Run the kubeadm joint command like this on the worker nodes.
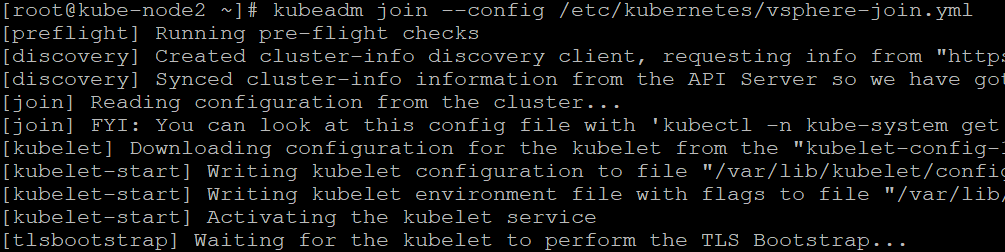
kubeadm join --config /etc/kubernetes/vsphere-join.yml
When the cluster is setup, there will be a connection to your vSphere environment that is housing the k8s nodes. Don’t forget to set your KUBECONFIG path to the admin.conf file and then deploy your flannel networking pods with the:
kubectl apply -f https://raw.githubusercontent.com/coreos/flannel/bc79dd1505b0c8681ece4de4c0d86c5cd2643275/Documentation/kube-flannel.yml
Let’s move on to storage classes for now that the cluster has been initialized and in a ready state.

Storage Classes - In Action
Before we create a Storage Class, login to your vSphere environment and navigate to your datastore where new disks should be created. Create a kubevols folder in that datastore.
Lets create a manifest file for a storage class. Remember that this class acts like a template to create PVs so the format may look familiar to you. I’ve created a new class named “thin-disk” which will create a thin provisioned disk provided by vSphere. I’ve also made this StorageClass the default, which you can of course only have 1 at a time. Note the provisioner listed here, as it is specific to the cloud provider being used.
kind: StorageClass
apiVersion: storage.k8s.io/v1
metadata:
  name: vsphere-disk #name of the default storage class
  annotations:
    storageclass.kubernetes.io/is-default-class: "true" #Make this a default storage class. There can be only 1 or it won't work.
provisioner: kubernetes.io/vsphere-volume
parameters:
  diskformat: thin
Deploy the Kubernetes manifest file with the apply command.
kubectl apply -f [manifest file].yml
You can check the status of your StorageClass by running:
kubectl get storageclass

Now to test out that storage class and see if it will create new PVs if a claim is issued. Create a new persistent volume claim and apply it. Here is one you can test with:
kind: PersistentVolumeClaim
apiVersion: v1
metadata:
  name: test-claim
  annotations:
    volume.beta.kubernetes.io/storage-class: vsphere-disk
spec:
  accessModes:
    - ReadWriteOnce
  resources:
    requests:
      storage: 2Gi
Apply it with the kubectl apply -f [manifest].yml command.
When you apply the PVC you can check the status with a kubectl get PVC command to see whats happening. You can see from the screenshot below that good things are happening because the status is “Bound.”

Now, for a quick look in the vSphere environment, we can look in the kubevols folder in the datastore we specified. That claim that was deployed used the Storage Class to deploy a vmdk for use by the Kubernetes cluster.

Summary
Persistent Volumes are necessary, and dynamically deploying them with a storage class may become necessary depending on your application. Adding a cloud provider can really increase the usability of your Kubernetes cluster, especially if its located within a public cloud where you can use a variety of services with your containers.