Containers are often times short lived. They might scale based on need, and will redeploy when issues occur. This functionality is welcomed, but sometimes we have state to worry about and state is not meant to be short lived. Kubernetes persistent volumes can help to resolve this discrepancy.
Volumes - The Theory
In the Kubernetes world, persistent storage is broken down into two kinds of objects. A Persistent Volume (PV) and a Persistent Volume Claim (PVC). First, lets tackle a Persistent Volume.
Persistent Volumes
Persistent Volumes are simply a piece of storage in your cluster. Similar to how you have a disk resource in a server, a persistent volume provides storage resources for objects in the cluster. At the most simple terms you can think of a PV as a disk drive. It should be noted that this storage resource exists independently from any pods that may consume it. Meaning, that if the pod dies, the storage should remain intact assuming the claim policies are correct. Persistent Volumes are provisioned in two ways, Statically or Dynamically.
Static Volumes - A static PV simply means that some k8s administrator provisioned a persistent volume in the cluster and it’s ready to be consumed by other resources.
Dynamic Volumes - In some circumstances a pod could require a persistent volume that doesn’t exist. In those cases it is possible to have k8s provision the volume as needed if storage classes were configured to demonstrate where the dynamic PVs should be built. This post will focus on static volumes for now.
Persistent Volume Claims
Pods that need access to persistent storage, obtain that access through the use of a Persistent Volume Claim. A PVC, binds a persistent volume to a pod that requested it.
When a pod wants access to a persistent disk, it will request access to the claim which will specify the size , access mode and/or storage classes that it will need from a Persistent Volume. Indirectly the pods get access to the PV, but only through the use of a PVC.
Claim Policies
We also reference claim policies earlier. A Persistent Volume can have several different claim policies associated with it including:
Retain - When the claim is deleted, the volume remains.
Recycle - When the claim is deleted the volume remains but in a state where the data can be manually recovered.
Delete - The persistent volume is deleted when the claim is deleted.
The claim policy (associated at the PV and not the PVC) is responsible for what happens to the data on when the claim has been deleted.
Volumes - In Action
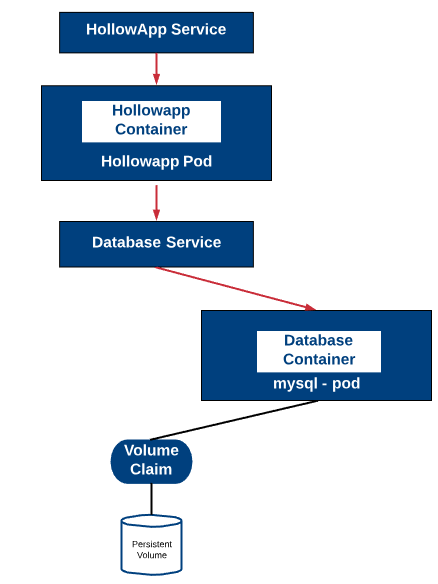
For the demonstration in the lab, we’ll begin by deploying something that looks like the diagram below. The application service and pod won’t change from what we’ve done before, but we need a front end to our application. However, the database pod will use a volume claim and a persistent volume to store the database for our application. Also, if you’re following my example exactly, I’m using an ingress controller for the application, but however you present your application outside of the Kubernetes cluster is fine.
First, we’ll start by deploying a persistent volume through a manifest file. Remember that you can deploy these manifest files by running:
kubectl apply -f [manifest file].yml
Here is a sample manifest file for the persistent volume. This is a static persistent volume.
apiVersion: v1
kind: PersistentVolume
metadata:
  name: mysqlvol
spec:
  storageClassName: manual
  capacity:
    storage: 10Gi #Size of the volume
  accessModes:
    - ReadWriteOnce #type of access
  hostPath:
    path: "/mnt/data" #host location
After you deploy your persistent volume, you can view it by running:
kubectl get pv
Now that the volume has been deployed, we can deploy our claim.
NOTE: you can deploy the pv, pvc, pods, services, etc within the same manifest file, but for the purposes of this blog I’ll often break them up so we can focus on one part over the other.
---
apiVersion: v1
kind: PersistentVolumeClaim
metadata:
  name: mysqlvol
spec:
  storageClassName: manual
  accessModes:
    - ReadWriteOnce
  resources:
    requests:
      storage: 10Gi
Once your claim has been created, we can look for those claims by running:
kubectl get pvc
Great, the volume is setup and a claim ready to be used. Now we can deploy our database pod and service. The database pod will mount the volume via the claim and we’re specifying in our pod code, that the volume will be mounted in the /var/lib/mysql directory so it can store our database for mysql.
apiVersion: apps/v1
kind: Deployment
metadata:
  name: hollowdb
  labels:
    app: hollowdb
spec:
  replicas: 1
  selector:
    matchLabels:
      app: hollowdb
  strategy:
    type: Recreate
  template:
    metadata:
      labels:
        app: hollowdb
    spec:
      containers:
      - name: mysql
        image: theithollow/hollowapp-blog:dbv1
        imagePullPolicy: Always
        ports:
        - containerPort: 3306
        volumeMounts:
        - name: mysqlstorage
          mountPath: /var/lib/mysql
      volumes:
      - name: mysqlstorage
        persistentVolumeClaim:
          claimName: mysqlvol
---
apiVersion: v1
kind: Service
metadata:
  name: hollowdb
spec:
  ports:
  - name: mysql
    port: 3306
    targetPort: 3306
    protocol: TCP
  selector:
    app: hollowdb
And now that we’ve got a working mysql container with persistent storage for the database, we can deploy our app.
NOTE: In this example, my application container, checks to see if there is a database for the app created already. If there is, it will use that database, if there isn’t, it will create a database on the mysql server.
Also, I’m using a secret for the connection string as we’ve discussed in a previous post.
apiVersion: apps/v1
kind: Deployment
metadata:
  labels:
      app: hollowapp
  name: hollowapp
spec:
  replicas: 3
  selector:
    matchLabels:
      app: hollowapp
  strategy:
    type: Recreate
  template:
    metadata:
      labels:
        app: hollowapp
    spec:
      containers:
      - name: hollowapp
        image: theithollow/hollowapp-blog:allin1
        imagePullPolicy: Always
        ports:
        - containerPort: 5000
        env:
        - name: SECRET_KEY
          value: "my-secret-key"
        - name: DATABASE_URL
          valueFrom:
            secretKeyRef:
              name: hollow-secret
              key: db.string
---
apiVersion: v1
kind: Service
metadata:
  name: hollowapp
  labels:
    app: hollowapp
spec:
  type: ClusterIP
  ports:
  - port: 5000
    protocol: TCP
    targetPort: 5000
  selector:
    app: hollowapp
---
apiVersion: extensions/v1beta1
kind: Ingress
metadata:
  name: hollowapp
  labels:
    app: hollowapp
spec:
  rules:
  - host: hollowapp.hollow.local
    http:
      paths:
      - path: /
        backend:
          serviceName: hollowapp
          servicePort: 5000
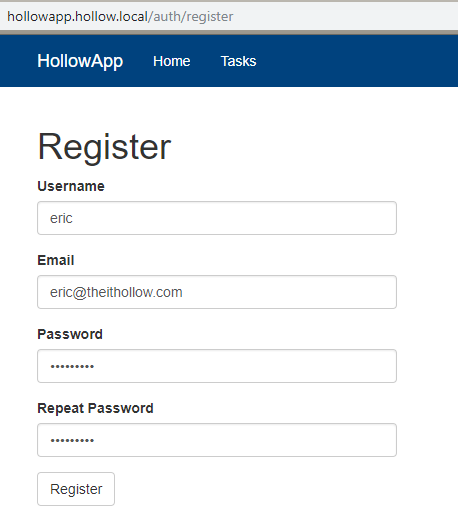
Once the application has been deployed, it should connect to the database pod and set it up and then start presenting our application. Let’s check by accessing it from our ingress controller.
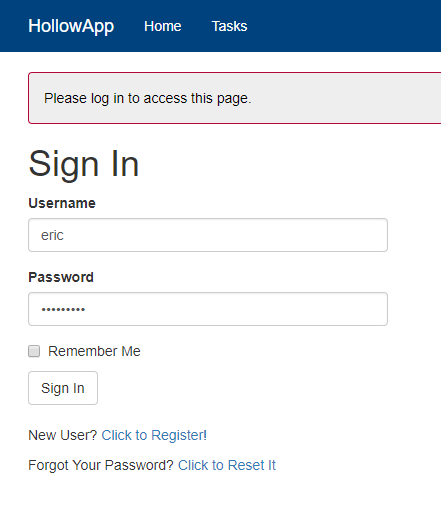
As you can see from the screenshot below, my app came up and I’m registering a user within my application as a test. This proves that I can submit data to my form and have it stored in the database pod.
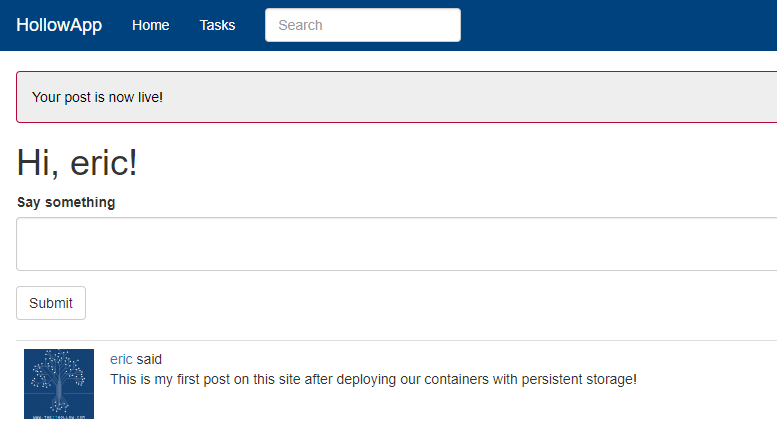
After I register a user I can then submit a post just to show that we’re posting data and displaying it through the application. You can see that the first post is successful and it foreshadows our next step.
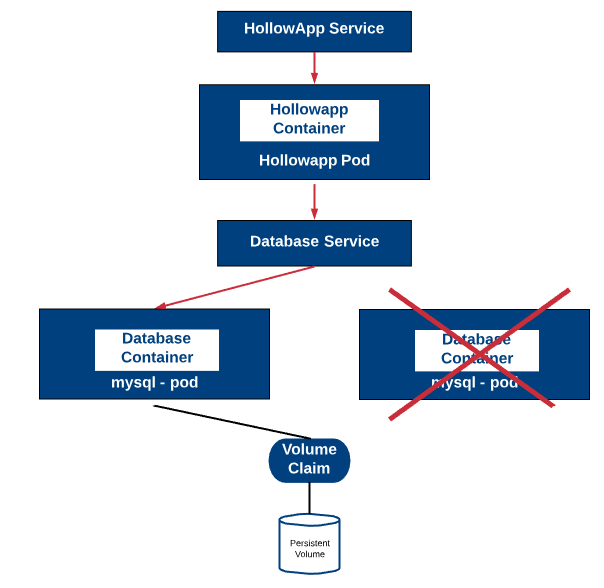
Now that the app works, lets test the database resiliency. Remember that with replica set, Kubernetes will make sure that we have a certain number of pods always running. If one fails, it will be rebuilt. Great when there is no state involved. Now we have a persistent volume with our database in it. Therefore, we should be able to kill that database pod and a new one will take its place and attach to the persistent storage. The net result will be an outage, but when it comes back up, our data should still be there. The diagram below demonstrates what will happen.
So lets break some stuff!
Lets kill our database pod from the command line.
kubectl delete pod [database pod name]
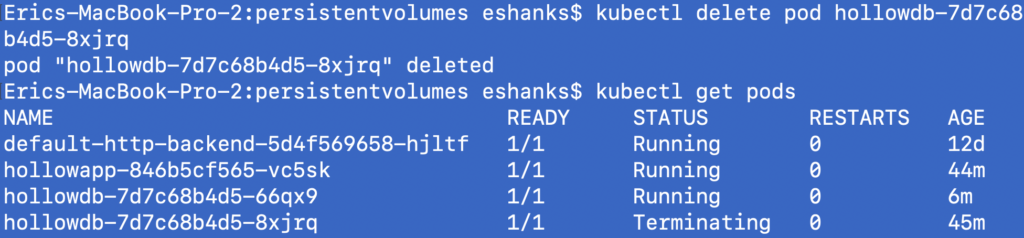
In the screenshot above you see that the pod was delete, and then I ran a “get pod” command to see whats happening. my DB pod is Terminating and a new one is in a running status already.
Let’s check the state of our application. NOTE: depending on what app you have here, it may or may not handle the loss of a database connection well or not. Mine did fine in this case.
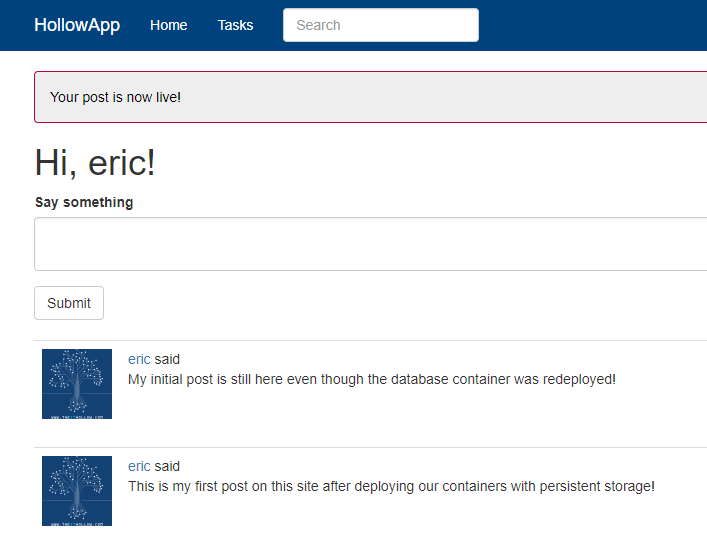
Back in my application, I’m able to login with the user that I registered earlier, which is a good sign.
And once I’m logged in, I can see my previous post which means my database is functioning even though its in a new pod. The volume still stored the correct data and was re-attached to the new pod.
Summary
Well persistent volumes aren’t the most interesting topic to cover around Kubernetes, but if state is involved, they are critical to the resiliency of your applications. If you’re designing your applications, consider whether a pod with persistent volumes will suffice, or if maybe an external service like a cloud database is the right choice for your applications.