I’m not going to lie to you, as of the time of this writing, maybe the biggest hurdle to learning Kubernetes is getting a cluster stood up. Right now there are a myriad of ways so stand up a cluster, but none of them are really straight forward yet. If you’re interested in learning how Kubernetes works, and just want to setup a basic cluster to poke around in, this post is for you.
Normally, when building a Kubernetes cluster, you’ll need some virtual machines or physical servers. You’d need some machines for the control plane and some machines to run your workloads and sometimes these servers are the same. But using an open source project called, " Kind", lets us spin up a Kubernetes cluster on docker containers using your own laptop instead of needing a bunch of VMs.
Now as you can imagine, using docker containers as your Kubernetes nodes is probably not a good thing to run your production workloads on, but a great solution to do some labbing on your laptop. There are other projects popping up that use Kind as a temporary Kubernetes cluster. See the details on the Cluster API project.
Install Kind
Let’s install Kind on a mac laptop to show how it works. First we need to make sure that we’ve got a Docker daemon up and running on our laptop. You can install the Docker desktop from the Docker Community Edition site.
Once we’ve got Docker up and running, it’s time to download the Kind binary to our laptop and then put that binary into our system path. We can do this by opening up a terminal on our laptop and pulling down the binary using curl, and then changing the permissions so we can execute the binary.
NOTE: change the path based on which release you’re looking for. This release is from v0.5.1 but check the Kind project release page for the latest changes.
curl -Lo ./kind https://github.com/kubernetes-sigs/kind/releases/download/v0.5.1/kind-$(uname)-amd64
chmod +x ./kind

Once we’ve downloaded the binary we need to move it to a location on our laptop that is in the PATH variable. If you aren’t sure where you can place the binary, run:
echo $PATH
The above command will show what locations are in the system path. Move your binary to one of these locations either through the command line or a finder window. When you’re done, you should be able to check the version with the command:
kind version
If everything is setup, we should see something similar to the image below.

I should also mention that in order to interact with any clusters built on your laptop, you’ll still need the kubectl binary on your laptop to interact with the cluster.
Build a Cluster
Once you’re at this stage, building a new cluster is pretty simple. Just run:
kind create cluster
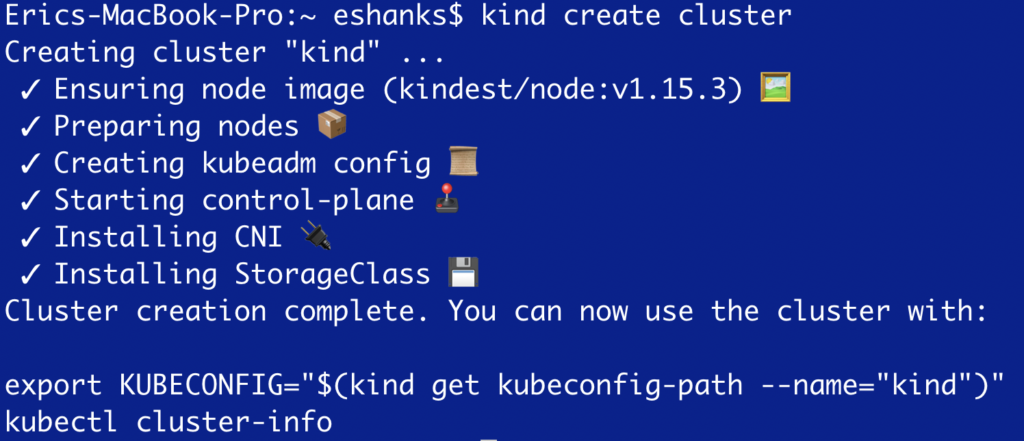
After running this command, a new Kubernetes cluster will be stood up on your laptop using docker containers. You’ll notice that at the end of the create cluster routine, it lists the command needed to get the kubeconfig file and export it so that it can be used with the kubectl binary and start interacting with the cluster. In my case it was:
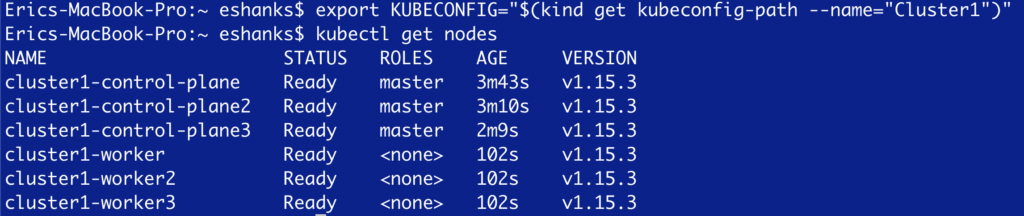
export KUBECONFIG="$(kind get kubeconfig-path --name="kind")"
At this point you’ve got a working cluster. You can now start issuing your kubectl commands once you’re run the export command above. What you do with your Kubernetes cluster from there on out is your business and outside the goal of this post.
If you want to list your clusters, you can run:
kind get clusters

This command will show you the list of all kind clusters on your system. You’ll notice by default that the name of your cluster is also “kind”. If you’d like to create a cluster with a specific name, you can use the command:
kind create cluster --name [cluster_name_here]
When you’re done with your cluster, you can delete the cluster by running:
kind delete cluster --name [cluster_name_here]
Customize Kind
If you followed the instructions above, you’ve deployed a cluster with a single node. Thats great, but isn’t going to cut it if we need to do more extensive testing/learning.
Luckily, we can pass kind a configuration file to customize the way our kind cluster is build. For this example, let’s deploy a six node cluster with three control plane nodes and three worker nodes.
First, we need to create a configuration file which is built in YAML. The config file I’ve used is listed below. Save the file on your laptop so it can be passed to the next command.
#6 node cluster
kind: Cluster
apiVersion: kind.sigs.k8s.io/v1alpha3
nodes:
  - role: control-plane
  - role: control-plane
  - role: control-plane
  - role: worker
  - role: worker
  - role: worker
Once you’ve created the config file, the create command can be run again with the config file passed as a parameter.
kind create cluster --name [Cluster_name_here] --config [config_file_name.yml]
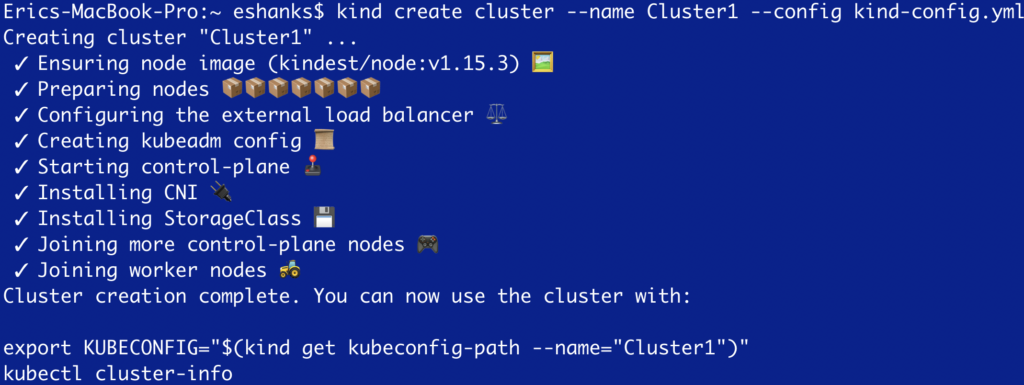
Once the cluster is built, and you’ve exported your KUBECONFIG again, you’ll see that the cluster matches the configs.
Summary
Kind is a really useful tool that can be helpful when we are learning Kubernetes. Standing up a new cluster right on your laptop so that you can issue commands to it is a great way to learn things. But the applications of a tool like Kind go far beyond that. We’ll look at leveraging Kind to bootstrap a production cluster in another post.