Securing and hardening our Kubernetes clusters is a must do activity. We need to remember that containers are still just processes running on the host machines. Sometimes these processes can get more privileges on the Kubernetes node than they should, if you don’t properly setup some pod security. This post explains how this could be done for your own clusters.
Pod Security Policies - The Theory
Pod Security policies are designed to limit what can be run on a Kubernetes cluster. Typical things that you might want to limit are: pods that have privileged access, pods with access to the host network, and pods that have access to the host processes just to name a few. Remember that a container isn’t as isolated as a VM so we should take care to ensure our containers aren’t adversely affecting our nodes’s health and security.
Pod Security Policies (PSP) are an optional admission controller added to a cluster. These admission controllers are an added check that determines if a pod should be admitted to the cluster. This is an additional check that comes after both authentication and authorization have been checked for the api call. A pod security policy uses the admission controller to check and see if our pod meets our extra level of scrutiny before being added to our cluster.
Pod Security Policies - In Action
To demonstrate how Pod Security Policies work, we’ll create a policy that blocks pods from having privileged access to the host operating system. Now, the first thing we’ll do here is to enable the admission controller in our API server specification.
NOTE: enabling the admission controller does not have to be the first step. In fact, once you enable the admission controller on the API server, no pods will be able to be deployed (or redeployed) because there will not be a policy that matches. By default, EVERY pod deployment will be blocked. It may be a good idea to apply your PSPs first so that it doesn’t interrupt operations.
To demonstrate, we’ll first create a pod specification that does not have any privileged [escalated] access to our cluster. The container specification of the manifest below has the “allowPrivilegeEscalation: false”. If you deploy this before enabling the admission controller. Everything should work fine. Save this file as not-escalated.yaml.
apiVersion: apps/v1
kind: Deployment
metadata:
  name: not-escalated
  labels:
    app: not-escalated
spec:
  replicas: 1
  selector:
    matchLabels:
      app: not-escalated
  template:
    metadata:
      labels:
        app: not-escalated
    spec:
      containers:
      - name: not-escalated
        image: busybox
        command: ["sleep", "3600"]
        securityContext:
          allowPrivilegeEscalation: false
Now apply the manifest to your cluster with the command:
kubectl create -f not-escalated.yaml
Check to see if your pods got deployed by running:
kubectl get pods

At this point, all we’ve done is prove that a simple pod works on our cluster before we enable our admission controller. Hang on to this pod manifest, because we’ll use it again later.
Now we’ll enable the admission control plugin for PodSecurityPolicy. You can see the api-server flag that I used below. NOTE: applying this during your cluster bootstrapping may prevent even the cricital kube-system pods from starting up. In this case, I’ve applied this configuration setting after the initial bootstrap phase were my kube-system pods are ALREADY running.
- kube-apiserver
    - --enable-admission-plugins=NodeRestriction,PodSecurityPolicy
Once the PodSecurityPolicy admission control plugin is enabled, we can try to apply the not-escalated.yaml manifest again. Once deployed, we can check our replica set and we should notice that the pod was not deployed. Remember that without an appropriate policy set, NO PODS will be able to be deployed.
In the screenshot below you can see that no pods were found after I deployed the same manifest file. To dig deeper, I check the replica set that should have created the pods. There I see a desired count of “1” but no pods deployed.
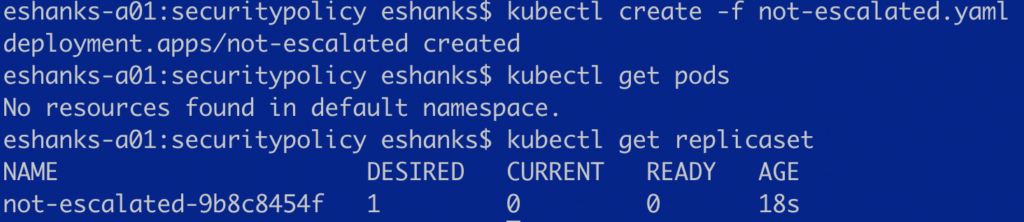
The reason for this is that there is no PodSecurityPolicy that would allow a pod of ANY kind to be deployed. Let’s fix that next, but delete that deployment for now.
OK, so now the next step is to create a psp that will let us deploy pods that don’t require privilege escalation (like the one we just did) but not let us deploy a pod that does require escalation.
Right. Now lets apply our first pod security policy that allows pods to be deployed if they don’t require any special access. Below is a PSP that allows non-privileged pods to be deployed.
apiVersion: policy/v1beta1
kind: PodSecurityPolicy
metadata:
  name: default-restricted
spec:
  privileged: false
  hostNetwork: false
  allowPrivilegeEscalation: false #This is the main setting we're looking at in this blog post.
  defaultAllowPrivilegeEscalation: false
  hostPID: false
  hostIPC: false
  runAsUser:
    rule: RunAsAny
  fsGroup:
    rule: RunAsAny
  seLinux:
    rule: RunAsAny
  supplementalGroups:
    rule: RunAsAny
  volumes:
  - 'configMap'
  - 'downwardAPI'
  - 'emptyDir'
  - 'persistentVolumeClaim'
  - 'secret'
  - 'projected'
  allowedCapabilities:
  - '*'
Deploy that PodSecurity Policy to your cluster with kubectl:
kubctl create -f [pspfilename].yaml

You might think that’s all we need to do, but it isn’t. The next step is to give the replica-controller access to this policy through the use of a ClusterRole and ClusterRoleBinding.
First, the cluster role is create to link the “psp” resource to the “use” verb.
kind: ClusterRole
apiVersion: rbac.authorization.k8s.io/v1
metadata:
  name: default-restrictedrole
rules:
- apiGroups:
  - extensions
  resources:
  - podsecuritypolicies
  resourceNames:
  - default-restricted
  verbs:
  - use
Apply the ClusterRole by apply the:
kubectl create -f [clusterRoleManifest].yaml
Next deploy the ClusterRoleBinding which links the previously created cluster role to the service accounts.
kind: ClusterRoleBinding
apiVersion: rbac.authorization.k8s.io/v1
metadata:
  name: default-psp-rolebinding
subjects:
- kind: Group
  name: system:serviceaccounts
  namespace: kube-system
roleRef:
  kind: ClusterRole
  name: default-restrictedrole
  apiGroup: rbac.authorization.k8s.io
Deploy the ClusterRoleBinding with the command:
kubectl create -f [clusterRoleBindingManifest].yaml

If everything has gone right, then we should have granted the replica-set controller the permissions needed to use the PodSecurityPolicy that allows our non-priviledged pods to be deployed. Time to test that by deploying that not-escalated.yaml manifest again.

Our pod was deployed correctly! Now we need to test one more thing. We’ll change the option on that manifest file to AllowPriviliged access on our container. The manifest below has that flag flipped for you.
apiVersion: apps/v1
kind: Deployment
metadata:
  name: escalated
  labels:
    app: escalated
spec:
  replicas: 1
  selector:
    matchLabels:
      app: escalated
  template:
    metadata:
      labels:
        app: escalated
    spec:
      containers:
      - name: not-escalated
        image: busybox
        command: ["sleep", "3600"]
        securityContext:
          allowPrivilegeEscalation: true
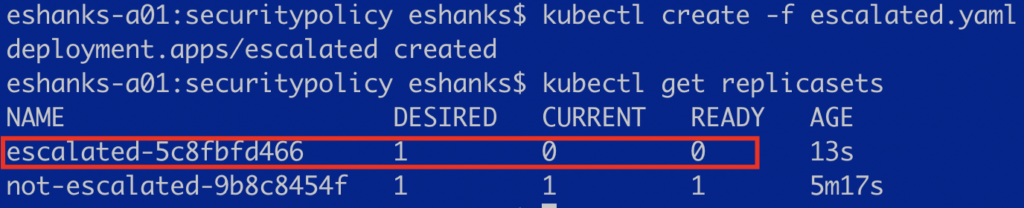
Now save that manifest as “escalated.yaml” and we’ll apply it to our cluster and then check the replicasets and pods again. This container is the one we’re trying to prevent from being deployed in our cluster.
kubectl create -f escalated.yaml
You can see from the screenshot that the priviledged container could not run in our cluster with our PodSecurityPolicy.
Just a reminder, this policy on its own might not be good for a production environment. If you have any pods in your kube-system namespace for instance, that actually need privileged access, this policy will block those too. Keep that in mind even if everything seems to be working fine right now. Leaving this policy in place will also keep them from restarting if they fail, or the node is restarted. So be careful with them.
Summary
Pod Security Policies can be an important part to your cluster health since they can reduce unwanted actions being taken on your host. PSPs require an admission controller to be enabled on the kube-api server. After which all pods will be denied until a PSP that allows them is created, and permissions given to the appropriate service account.