If you’re struggling to deploy Kubernetes (k8s) clusters, you’re not alone. There are a bunch of different ways to deploy Kubernetes and there are different settings depending on what cloud provider you’re using. This post will focus on installing Kubernetes on vSphere with Kubeadm. At the end of this post, you should have what you need to manually deploy k8s in a vSphere environment on ubuntu.
Prerequisites
NOTE: This tutorial uses the “in-tree” cloud provider for vSphere. This is not the preferred method for deployment going forward. More details can be found here for reference.
Before we start configuring and deploying Kubernetes, we need to ensure we have the proper environment setup. My lab will consist of three ubuntu virtual machines used for control plane (masters) nodes, and five additional machines for worker nodes. Your environment can vary with the number of nodes, but I’ve chosen to use three control plane nodes to show the high availability configurations. My environment looks roughly like this diagram:
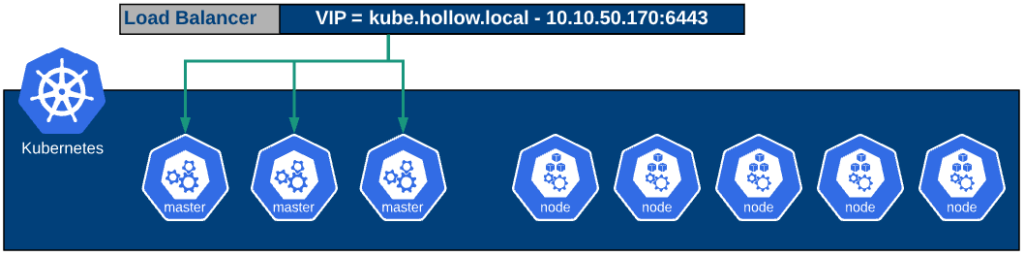
Note that having multiple control plane nodes requires having a load balancer to distribute traffic to these VMs. The load balancer should have a health check on port 6443 on the control plane nodes and a VIP. I’m using a Kemp load balancer in my lab where I’ve created a VIP and a corresponding DNS name for this vip.
- VIP - 10.10.50.170:6443
- DNS Name - kube.hollow.local
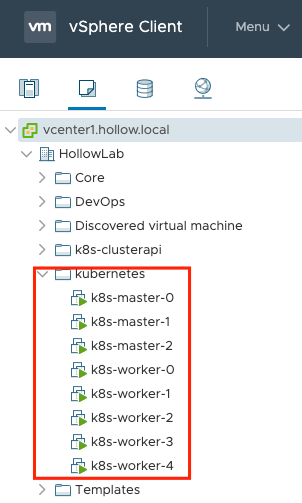
These Kubernetes virtual machines should be placed within their own VM folder in vSphere. You can see that I created a folder named “kubernetes” for this post.
Also, the virtual machines that will be used for the Kubernetes cluster need to have an advanced setting changed for each VM. The disk.EnableUUID parameter must be set to true. This can be automated of course, but this post focuses on the manual settings so you can see whats happening.
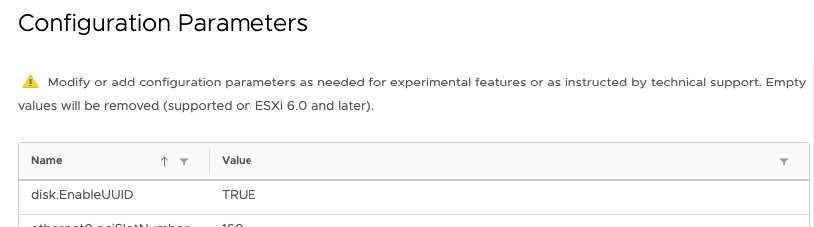
Right Click the k8s node in vCenter and choose edit settings. From there, go to the VM Options tab and scroll down to find the “Edit Configuration” link in the Configuration Parameters settings.
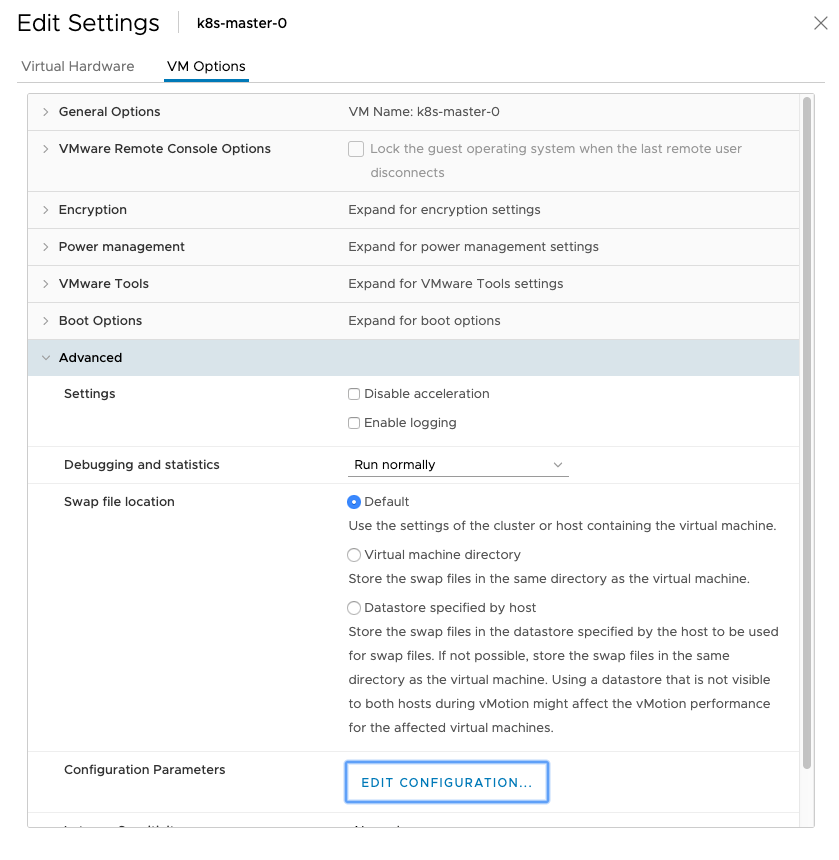
Find the disk.EnableUUID and set the value to true.
vSphere Permissions
Some components of Kubernetes work better when they are tied with a cloud provider such as vSphere or AWS. For example, when you create a Persistent Volume, it sure would be nice to have the cloud provider provision storage for that volume wouldn’t it? Well before we can couple Kubernetes with vSphere, we need to setup some permissions first.
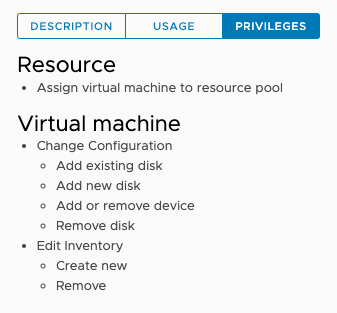
We will need to create a few roles, of which I will show the permissions granted to each below in a screenshot.
manage-k8s-node-vms
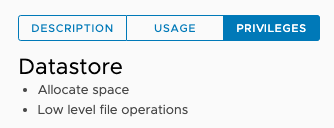
manage-k8s-volumes
k8s-system-read-and-spbm-profile-view

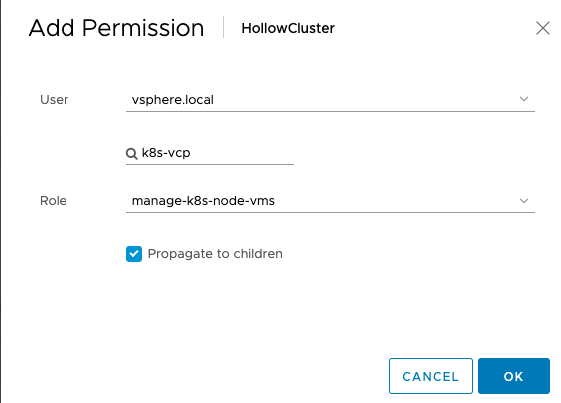
Once these roles have been created with the appropriate permissions assigned, they must be added to the proper entity in vCenter and associated with a user. In my case I’m using a service account called " k8s-vcp".
Be sure to add the appropriate role to the correct entity and user. The table below shows how they should be assigned.
Role to be AssignedEntityPropagate?****manage-k8s-node-vmsCluster, Hosts, k8s nodes VM FolderYesmanage-k8s-volumesDatastore where new volumes will be createdNok8s-system-read-and-spbm-profile-viewvCenterNo**Read-Only (pre-created)**Datacenter, Datastore, Cluster, Datastore Storage FolderNo
For example, in my vSphere Cluster where my k8s vms live, I’ve added the " manage-k8s-node-vms" role to my k8s-vcp user and set it to propagate. Do this for each permission in the list above.
Create vSphere Config File
Now that we’ve got our permissions setup, we need to create a file with some login information in it. This config file is used by the k8s control plane to interact with vSphere. Think of it this way, we need to be able to tell the k8s control plane where our VMs live, what datastores to use, and under what user we should be making those calls from.
Create a vsphere.conf file and fill it out with the information from the template below, filling in your own information as appropriate. The file below are the settings used in my environment. For details about how this file can be constructed, visit the VMware.github.io page for details on how you can setup multiple vCenters for example.
[Global]
user = "[email protected]"
password = "Password123"
port = "443"
insecure-flag = "1"

[VirtualCenter "vcenter1.hollow.local"]
datacenters = "HollowLab"

[Workspace]
server = "vcenter1.hollow.local"
datacenter = "HollowLab"
default-datastore = "vsanDatastore"
resourcepool-path = "HollowCluster/Resources"
folder = "kubernetes"

[Disk]
scsicontrollertype = pvscsi
Create a Kubeadm Config File
Now we’re pretty much done with the vSphere side. We’re ready to start working on the Kubernetes pieces. The first section we’ll cover is creating the kubeadm.conf file. This file has instructions on how to setup the control plane components when we use kubeadm to bootstrap them. There are a ton of options here so we won’t go into all of them. The important pieces are to note that we need to provide the vsphere.conf file as parameters in this kubeadm configuration. The file below is what I used to setup my cluster. Be sure to update the IP addresses and DNS Names for your load balancer here as well.
---
apiServer:
  extraArgs:
    cloud-config: /etc/kubernetes/vsphere.conf
    cloud-provider: vsphere
    endpoint-reconciler-type: lease
  extraVolumes:
  - hostPath: /etc/kubernetes/vsphere.conf
    mountPath: /etc/kubernetes/vsphere.conf
    name: cloud
apiServerCertSANs:
- 10.10.50.170
- kube.hollow.local
apiServerExtraArgs:
  endpoint-reconciler-type: lease
apiVersion: kubeadm.k8s.io/v1beta1
controlPlaneEndpoint: kube.hollow.local
controllerManager:
  extraArgs:
    cloud-config: /etc/kubernetes/vsphere.conf
    cloud-provider: vsphere
  extraVolumes:
  - hostPath: /etc/kubernetes/vsphere.conf
    mountPath: /etc/kubernetes/vsphere.conf
    name: cloud
kind: ClusterConfiguration
kubernetesVersion: 1.17.0
networking:
  podSubnet: 192.168.0.0/16
Kubernetes VM Setup
Now we can start installing components on the ubuntu VMs before we deploy the cluster. Do this on all virtual machines that will be part of your Kubernetes Cluster.
Disable swap
swapoff -a
sed -i.bak -r 's/(.+ swap .+)/#\1/' /etc/fstab
Install Kubelet, Kubeadm, and Kubectl
sudo apt-get update && sudo apt-get install -y apt-transport-https curl
curl -s https://packages.cloud.google.com/apt/doc/apt-key.gpg | sudo apt-key add -
cat <<EOF | sudo tee /etc/apt/sources.list.d/kubernetes.list
deb https://apt.kubernetes.io/ kubernetes-xenial main
EOF
sudo apt-get update
sudo apt-get install -y kubelet kubeadm kubectl
sudo apt-mark hold kubelet kubeadm kubectl
Install Docker and change the cgroup driver to systemd.
sudo apt install docker.io -y

cat > /etc/docker/daemon.json <<EOF
{
  "exec-opts": ["native.cgroupdriver=systemd"],
  "log-driver": "json-file",
  "log-opts": {
    "max-size": "100m"
  },
  "storage-driver": "overlay2"
}
EOF

sudo systemctl restart docker
sudo systemctl enable docker
Once you’ve completed the steps above, copy the vSphere.conf and kubeadm.conf files to /etc/kubernetes/ on your Control Plane VMs.
Once you’ve placed the Kubeadm.conf and vsphere.conf files in the /etc/kubernetes directory, we need to update the configuration of the Kubelet service so that it knows about the vsphere environment as well.
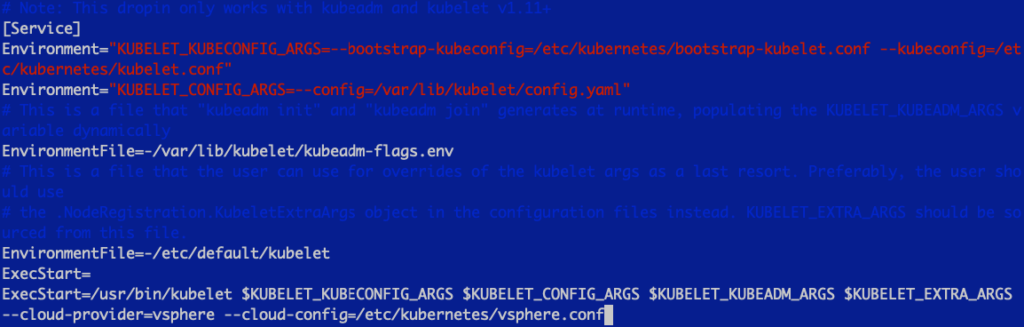
Edit the /etc/systemd/system/kubelet.service.d/10-kubeadm.conf and add two configuration options.
--cloud-provider=vsphere --cloud-config=/etc/kubernetes/vsphere.conf
When you’re done, recycle the kubelet service.
systemctl daemon-reload
Bootstrap the First K8s Control Plane Node
The time has come to setup the cluster. Login to one of your control plane nodes which will become the first master in the cluster. We’ll run the kubeadm initialization with the kubeadm.conf file that we created earlier and placed in the /etc/kubernetes directory.
kubeadm init --config /etc/kubernetes/kubeadm.conf --upload-certs
It may take a bit for the process to complete. Kubeadm init is ensuring that our api-server, controller-manager, and etcd container images are downloaded as well as creating certificates which you should find in the /etc/kubernetes/pki directory.
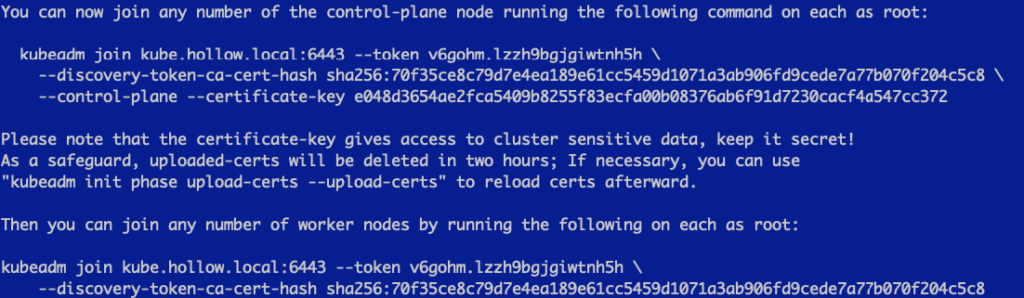
When the process is done, you should receive instructions on how to add additional control plane nodes and worker nodes.
Add Additional Control Plane Nodes
We can now take the information provided from our init command and run the kubeadm join provided in our output, on the other two control plane nodes.
Before we add those additional control plan nodes, you’ll need to copy the contents of the pki directory to the other control plane nodes. This is needed because they need those certificates for authentication purposes with the existing control plane node.
Your instructions are going to be different. The command below was what was provided to me.
kubeadm join kube.hollow.local:6443 --token v6gohm.lzzh9bgjgiwtnh5h \
    --discovery-token-ca-cert-hash sha256:70f35ce8c79d7e4ea189e61cc5459d1071a3ab906fd9cede7a77b070f204c5c8 \
    --control-plane --certificate-key e048d3654ae2fca5409b8255f83ecfa00b08376ab6f91d7230cacf4a547cc372
When you’re done with your additional control plane clsuters, you should see a success message with some instructions on setting up the KUBECONFIG file which we’ll cover later.
Join Worker Nodes to the Cluster
At this point we should have three control plane nodes working in our cluster. Let’s add the worker nodes now by using the other kubeadm join command presented to use after setting up our first control plane node.
Again, yours will be different, but for example purposes mine was:
kubeadm join kube.hollow.local:6443 --token v6gohm.lzzh9bgjgiwtnh5h \
    --discovery-token-ca-cert-hash sha256:70f35ce8c79d7e4ea189e61cc5459d1071a3ab906fd9cede7a77b070f204c5c8
Run the command on your worker nodes
Setup KUBECONFIG
Log back into your first Kubernetes control plane node and we’ll setup KUBECONFIG so we can issue some commands against our cluster and ensure that it’s working properly.
Run the following to configure your KUBECONFIG file for use:
export KUBECONFIG=/etc/kubernetes/admin.conf
When you’re done, you can run:
kubectl get nodes
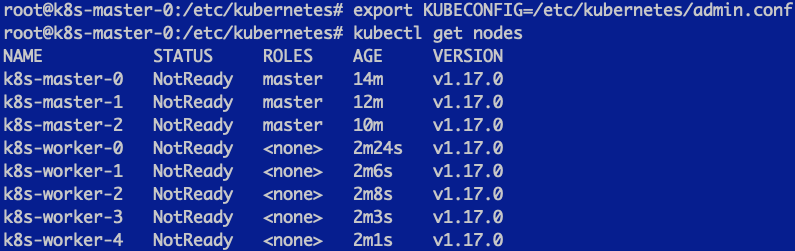
We can see here that we have a cluster created, but the status is not ready. This is because we’re missing a CNI.
Deploy a CNI
There are a variety of Networking interfaces that could be deployed. For this simple example I’ve used calico. Simply apply this manifest from one of your nodes.
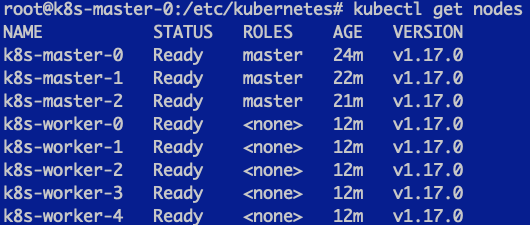
kubectl apply -f https://docs.projectcalico.org/v3.9/manifests/calico.yaml
When you’re done, you should have a working cluster.
Summary
At this point you should have a very basic Kubernetes cluster up and running and should be able to use storage classes with your vSphere environment. Your next steps should be building cool things on Kubernetes or tinkering around with the builds to use different CNIs, Container Runtimes, and automate it! Good luck!