The way you deploy Kubernetes (k8s) on AWS will be similar to how it was done in a previous post on vSphere. You still setup nodes, you still deploy kubeadm, and kubectl but there are a few differences when you change your cloud provider. For instance on AWS we can use the LoadBalancer resource against the k8s API and have AWS provision an elastic load balancer for us. These features take a few extra tweaks in AWS.
AWS Prerequisites
Before we start deploying Kubernetes, we need to ensure a few prerequisites are covered in our AWS environment. You will need the following components setup to use the cloud provider and have the kubeadm installation complete successfully.
- An AWS Account with administrative access.
- EC2 instances for Control plane nodes (This post uses three ubuntu nodes split across AWS Availability Zones, but this is not necessary.)
- EC2 instances hostname must match the private dns name assigned to it. For example, when I deployed my ec2 instance from template and ran
hostname, I got ip-10-0-4-208. However, when I check the private DNS from the ec2 instance metadata by the following commandcurl http://169.254.169.254/latest/meta-data/local-hostnameI received: ip-10-0-4-208.us-east-2.compute.internal. This won’t work. The hostname command must match the private dns name exactly. Use this command to set the hostname.
hostnamectl set-hostname <hostname.region.compute.internal>

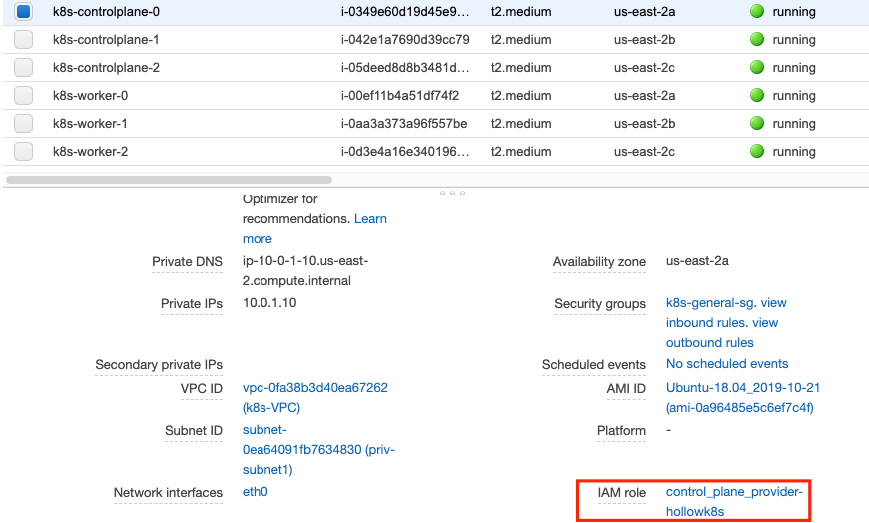
- To ensure the Control plane instances have access to AWS to spin up Load Balancers, ebs volumes, etc. we must apply an Instance Policy to the Control Plane nodes with the following iam policy:
{
  "Version": "2012-10-17",
  "Statement": [
    {
      "Effect": "Allow",
      "Action": [
        "autoscaling:DescribeAutoScalingGroups",
        "autoscaling:DescribeLaunchConfigurations",
        "autoscaling:DescribeTags",
        "ec2:DescribeInstances",
        "ec2:DescribeRegions",
        "ec2:DescribeRouteTables",
        "ec2:DescribeSecurityGroups",
        "ec2:DescribeSubnets",
        "ec2:DescribeVolumes",
        "ec2:CreateSecurityGroup",
        "ec2:CreateTags",
        "ec2:CreateVolume",
        "ec2:ModifyInstanceAttribute",
        "ec2:ModifyVolume",
        "ec2:AttachVolume",
        "ec2:AuthorizeSecurityGroupIngress",
        "ec2:CreateRoute",
        "ec2:DeleteRoute",
        "ec2:DeleteSecurityGroup",
        "ec2:DeleteVolume",
        "ec2:DetachVolume",
        "ec2:RevokeSecurityGroupIngress",
        "ec2:DescribeVpcs",
        "elasticloadbalancing:AddTags",
        "elasticloadbalancing:AttachLoadBalancerToSubnets",
        "elasticloadbalancing:ApplySecurityGroupsToLoadBalancer",
        "elasticloadbalancing:CreateLoadBalancer",
        "elasticloadbalancing:CreateLoadBalancerPolicy",
        "elasticloadbalancing:CreateLoadBalancerListeners",
        "elasticloadbalancing:ConfigureHealthCheck",
        "elasticloadbalancing:DeleteLoadBalancer",
        "elasticloadbalancing:DeleteLoadBalancerListeners",
        "elasticloadbalancing:DescribeLoadBalancers",
        "elasticloadbalancing:DescribeLoadBalancerAttributes",
        "elasticloadbalancing:DetachLoadBalancerFromSubnets",
        "elasticloadbalancing:DeregisterInstancesFromLoadBalancer",
        "elasticloadbalancing:ModifyLoadBalancerAttributes",
        "elasticloadbalancing:RegisterInstancesWithLoadBalancer",
        "elasticloadbalancing:SetLoadBalancerPoliciesForBackendServer",
        "elasticloadbalancing:AddTags",
        "elasticloadbalancing:CreateListener",
        "elasticloadbalancing:CreateTargetGroup",
        "elasticloadbalancing:DeleteListener",
        "elasticloadbalancing:DeleteTargetGroup",
        "elasticloadbalancing:DescribeListeners",
        "elasticloadbalancing:DescribeLoadBalancerPolicies",
        "elasticloadbalancing:DescribeTargetGroups",
        "elasticloadbalancing:DescribeTargetHealth",
        "elasticloadbalancing:ModifyListener",
        "elasticloadbalancing:ModifyTargetGroup",
        "elasticloadbalancing:RegisterTargets",
        "elasticloadbalancing:DeregisterTargets",
        "elasticloadbalancing:SetLoadBalancerPoliciesOfListener",
        "iam:CreateServiceLinkedRole",
        "kms:DescribeKey"
      ],
      "Resource": [
        "*"
      ]
    }
  ]
}
- EC2 instances for worker nodes (Likewise, this post uses three ubuntu worker nodes across AZs)
- Worker node EC2 instances also need an AWS Instance Profile assigned to them with permissions to the AWS control plane.
{
      "Version": "2012-10-17",
      "Statement": [
          {
              "Effect": "Allow",
              "Action": [
                  "ec2:DescribeInstances",
                  "ec2:DescribeRegions",
                  "ecr:GetAuthorizationToken",
                  "ecr:BatchCheckLayerAvailability",
                  "ecr:GetDownloadUrlForLayer",
                  "ecr:GetRepositoryPolicy",
                  "ecr:DescribeRepositories",
                  "ecr:ListImages",
                  "ecr:BatchGetImage"
              ],
              "Resource": "*"
          }
      ]
  }

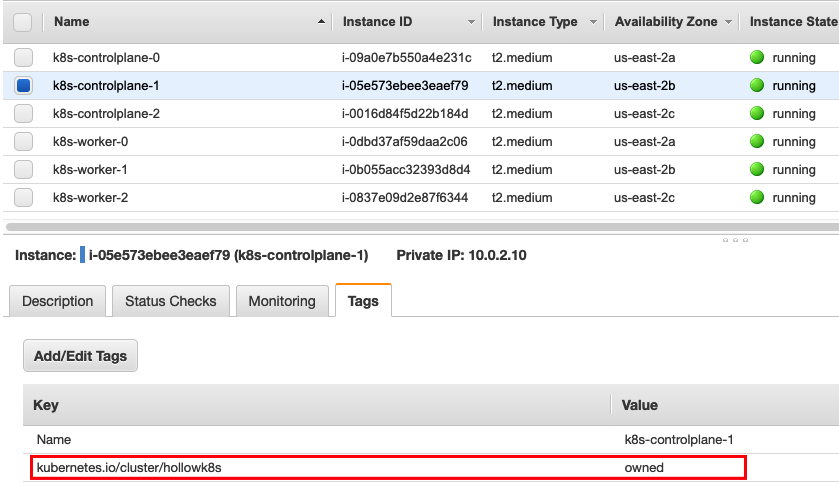
- All EC2 instances (Worker and Control Plane nodes) must have a tag named
kubernetes.io/cluster/<CLUSTERNAME>where CLUSTERNAME is a name you’ll give your cluster.
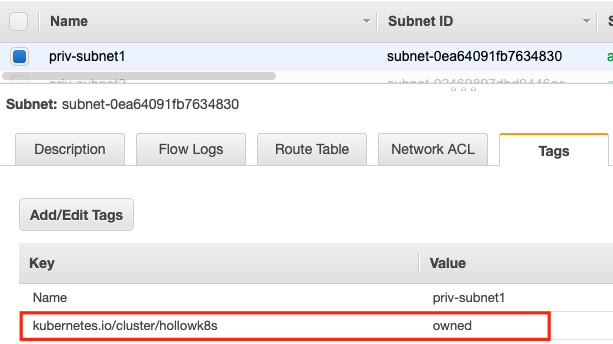
- Subnets must have a tag named
kubernetes.io/cluster/<CLUSTERNAME>. where CLUSTERNAME is the name you’ll give your cluster. This is used when new Load Balancers are attached to Availability Zones.
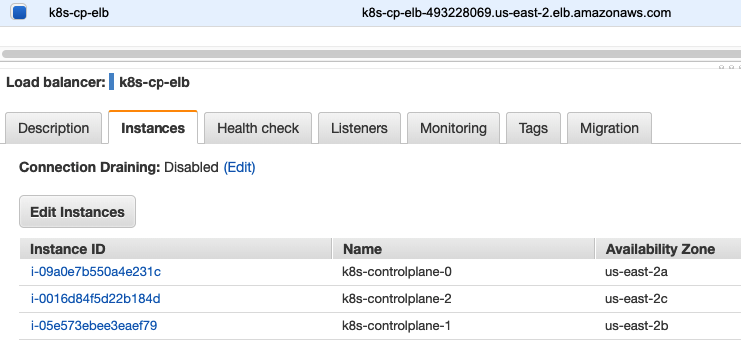
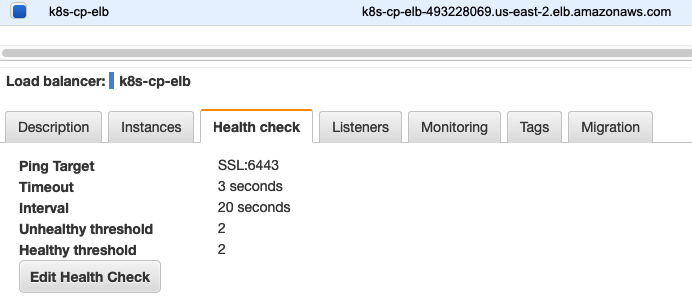
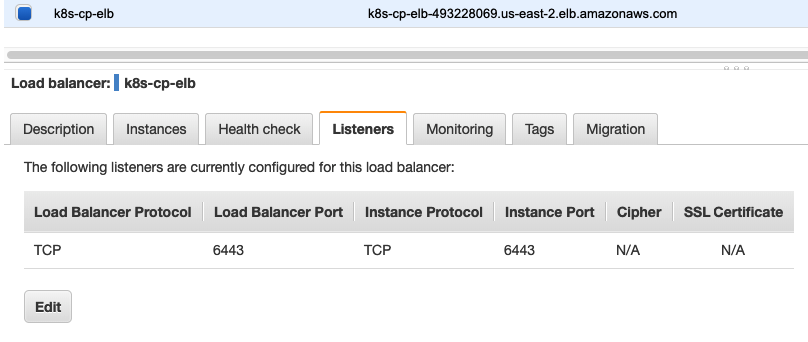
- An elastic load balancer setup and configured with the three master EC2 instances. There should be a health check on the targets of SSL:6443 as well as listeners.
- A DNS Entry configured to work with your load balancer.
The high level view of my instances are shown here:

Create a Kubeadm Config File
Now that the AWS infrastructure is ready to go, we’re ready to stat working on the Kubernetes pieces. The first section is dedicated to setting up a kubeadm.conf file. This file has instructions on how to setup the control plane components when we use kubeadm to bootstrap them. There are a ton of options that can be configured here, but we’ll use a simple example that has AWS cloud provider configs included.
Create a kubeadm.conf file based on the example below, using your own environment information.
---
apiServer:
  extraArgs:
    cloud-provider: aws
apiServerCertSANs:
- cp.theithollowlab.com
apiServerExtraArgs:
  endpoint-reconciler-type: lease
apiVersion: kubeadm.k8s.io/v1beta1
clusterName: hollowk8s #your cluster name
controlPlaneEndpoint: cp.theithollowlab.com #your VIP DNS name
controllerManager:
  extraArgs:
    cloud-provider: aws
    configure-cloud-routes: 'false'
kind: ClusterConfiguration
kubernetesVersion: 1.17.0 #your desired k8s version
networking:
  dnsDomain: cluster.local
  podSubnet: 172.16.0.0/16 #your pod subnet matching your CNI config
nodeRegistration:
  kubeletExtraArgs:
    cloud-provider: aws
Kubernetes EC2 Instance Setup
Now, we can start installing components on the ubuntu instances before we deploy the cluster. Do this on all virtual machines that will be part of your Kubernetes cluster.
Disable swap
swapoff -a
sed -i.bak -r 's/(.+ swap .+)/#\1/' /etc/fstab
Install Kubelet, Kubeadm, and Kubectl.
sudo apt-get update && sudo apt-get install -y apt-transport-https curl
curl -s https://packages.cloud.google.com/apt/doc/apt-key.gpg | sudo apt-key add -
cat <<EOF | sudo tee /etc/apt/sources.list.d/kubernetes.list
deb https://apt.kubernetes.io/ kubernetes-xenial main
EOF
sudo apt-get update
sudo apt-get install -y kubelet kubeadm kubectl
sudo apt-mark hold kubelet kubeadm kubectl
Install Docker and change the cgroup driver to systemd.
sudo apt install docker.io -y

cat > /etc/docker/daemon.json <<EOF
{
  "exec-opts": ["native.cgroupdriver=systemd"],
  "log-driver": "json-file",
  "log-opts": {
    "max-size": "100m"
  },
  "storage-driver": "overlay2"
}
EOF

sudo systemctl restart docker
sudo systemctl enable docker
Once you’ve completed the steps above, copy the kubeadm.conf file to /etc/kubernetes/ on the Control Plane VMs.
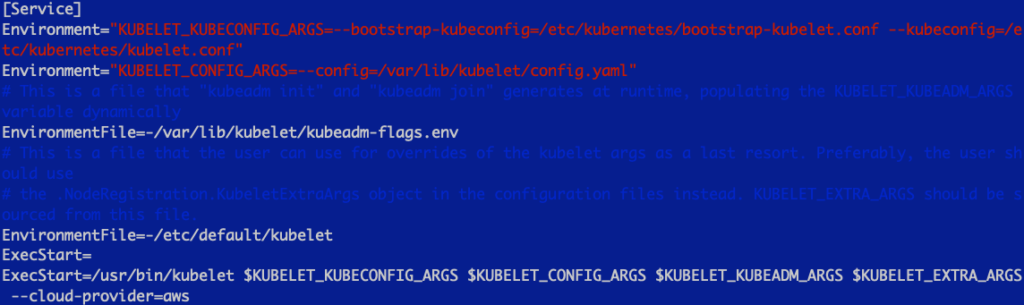
After the kubeadm.conf file is placed we need to update the configuration of the kubelet service so that it knows about the AWS environment as well. Edit the /etc/systemd/system/kubelet.service.d/10-kubeadm.conf and add an additional configuration option.
--cloud-provider=aws
Once the configuration has been made, reset the kubelet daemon.
systemctl daemon-reload
Bootstrap the First K8s Control Plane Node
The time has come to setup the cluster. Login to one of your control plane nodes which will become the first master in the cluster. We’ll run the kubeadm initialization with the kubeadm.conf file that we created earlier and placed in the /etc/kubernetes directory.
kubeadm init --config /etc/kubernetes/kubeadm.conf --upload-certs
It may take a bit for the process to complete. Kubeadm init is ensuring that our api-server, controller-manager, and etcd container images are downloaded as well as creating certificates which you should find in the /etc/kubernetes/pki directory.
When the process is done, you should receive instructions on how to add additional control plane nodes and worker nodes.
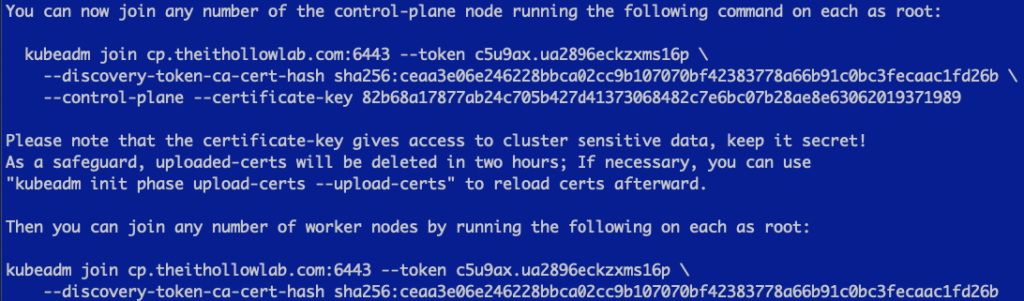
Add Additional Control Plane Nodes
We can now take the information provided from our init command and run the kubeadm join provided in our output, on the other two control plane nodes.
Before we add those additional control plan nodes, you’ll need to copy the contents of the pki directory to the other control plane nodes. This is needed because they need those certificates for authentication purposes with the existing control plane node.
Your instructions are going to be different. The command below was what was provided to me.
kubeadm join cp.theithollowlab.com:6443 --token c5u9ax.ua2896eckzxms16p \
    --discovery-token-ca-cert-hash sha256:ceaa3e06e246228bbca02cc9b107070bf42383778a66b91c0bc3fecaac1fd26b \
    --control-plane --certificate-key 82b68a17877ab24c705b427d41373068482c7e6bc07b28ae8e63062019371989
When you’re done with your additional control plane nodes, you should see a success message with some instrucitons on setting up the KUBECONFIG file, which we’ll cover later.
Join Worker Nodes to the Cluster
At this point we should have three control plane nodes working in our cluster. Let’s add the worker nodes now by using the other kubeadm join command presented to use after setting up our first control plane node.
Again, yours will be different, but for example purposes mine was:
kubeadm join cp.theithollowlab.com:6443 --token c5u9ax.ua2896eckzxms16p \
    --discovery-token-ca-cert-hash sha256:ceaa3e06e246228bbca02cc9b107070bf42383778a66b91c0bc3fecaac1fd26b
Setup KUBECONFIG
Log back into your first Kubernetes control plane node and we’ll setup KUBECONFIG so we can issue some commands against our cluster and ensure that it’s working properly.
Run the following to configure your KUBECONFIG file for use:
export KUBECONFIG=/etc/kubernetes/admin.conf
When you’re done, you can run:
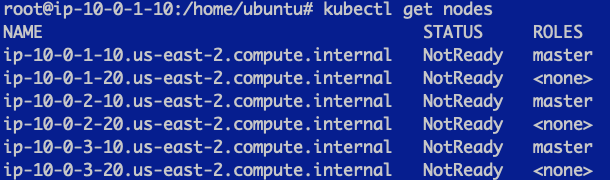
kubectl get nodes
We can see here that we have a cluster created, but the status is not ready. This is because we’re missing a CNI.
Deploy a CNI
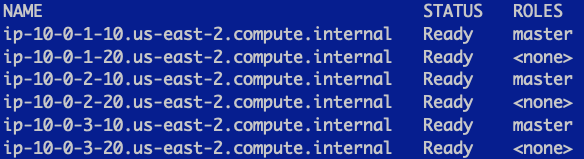
There are a variety of Networking interfaces that could be deployed. For this simple example I’ve used calico. Simply apply this manifest from one of your nodes.
kubectl apply -f https://docs.projectcalico.org/v3.9/manifests/calico.yaml
When you’re done, you should have a working cluster.
Deploy an AWS Storage Class
If you wish to use EBS volumes for your Persistent Volumes, you can apply a storage class manifest such as the following:
kubectl apply -f https://raw.githubusercontent.com/kubernetes/kubernetes/master/cluster/addons/storage-class/aws/default.yaml
Common Errors
There are some tricky places along the way, below are a few common issues you may run into when standing up your Kubernetes cluster.
Missing EC2 Cluster Tags
If you’ve forgotten to add the kubernetes.io/cluster/
The kubelet logs will include something like the following:
Tag “KubernetesCluster” nor “kubernetes.io/cluster/…” not found; Kubernetes may behave unexpectedly.
… failed to run Kubelet: could not init cloud provider “aws”: AWS cloud failed to find ClusterID
Missing Subnet Cluster Tags
If you’ve forgotten to add the kubernetes.io/cluster/

The controller managers will throw errors about a missing tags on the subnets.
failed to ensure load balancer: could not find any suitable subnets for creating the ELB
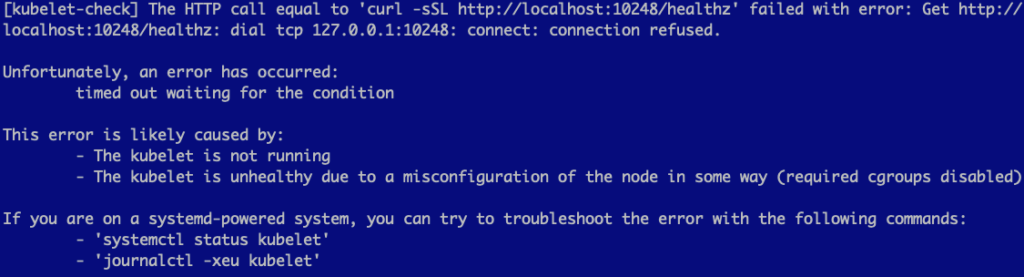
Node Names Don’t Match Private DNS Names
If your hostname and private dns names don’t match, you’ll see error messages during the kubeadm init phase.
Error writing Crisocket information for the control-plane node: timed out waiting for the condition.
The kubelet will show error messages about the node not being found.

To fix this, update the nodes hostnames so that they match the private dns names.
Summary
Once you’ve completed the above sections, you should have a functional Kubernetes cluster that can take advantage of things like LoadBalancers and EBS volumes through your Kubernetes API calls. Have fun!