In a previous post, we covered how to use an AWS Custom Resource in a CloudFormation template to deploy a very basic Lambda function. To expand upon this ability, lets use this knowledge to deploy something more useful than a basic Lambda function. How about we use it to create an AWS account? To my knowledge, the only way to create a new AWS account is to use the CLI or manually through the console. How about we use a custom resource to deploy a new account for us in our AWS Organization? Once this ability is available in a CloudFormation template, we could even publish it in the AWS Service Catalog and give our users an account vending machine capability.
Create the Lambda Function
Just as we did in the previous post, we’ll create a Lambda function, zip it up and place it into our S3 bucket. My function is Python 2.7 and can be found below.
#Import modules
import json, boto3, logging
from botocore.vendored import requests

#Define logging properties
log = logging.getLogger()
log.setLevel(logging.INFO)

#Main Lambda function to be excecuted
def lambda_handler(event, context):
    #Initialize the status of the function
    status="SUCCESS"
    responseData = {}
    client = boto3.client('organizations')

    #Read and log the input values
    acctName = event['ResourceProperties']['AccountName']
    ouName = event['ResourceProperties']['OUName']
    emailAddress = event['ResourceProperties']['Email']
    log.info("Account name is: " + acctName)
    log.info("Organizational Unit name is: " + ouName)
    log.info("Email Address is: " + emailAddress)

    #create a new Organizational Unit
    orgResponse = client.create_organizational_unit(
        ParentId="ou-3hvv-jqwq89r0", #My Parent OU. Change for your environment
        Name=ouName
    )

    log.info(orgResponse['OrganizationalUnit']['Id'])
    OUID=str(orgResponse['OrganizationalUnit']['Id'])

    #Create a new Account in the OU Just Created
    acctResponse = client.create_account(
        Email=emailAddress,
        AccountName=acctName
    )

    #Check Account Status
    acctStatusID = acctResponse['CreateAccountStatus']['Id']
    log.info(acctStatusID)

    while True:
        createStatus = client.describe_create_account_status(
            CreateAccountRequestId=acctStatusID
        )
        log.info(createStatus['CreateAccountStatus']['State'])
        if str(createStatus['CreateAccountStatus']['State']) != 'IN_PROGRESS':
            newAccountId = str(createStatus['CreateAccountStatus']['AccountId'])
            break

    #Move Account to new OU
    moveResponse = client.move_account(
        AccountId=newAccountId,
        SourceParentId='r-3hvv', #My root OU. Change for your environment
        DestinationParentId=OUID
    )

    #Set Return Data
    responseData = {"Message" : newAccountId} #If you need to return data use this json object

    #return the response back to the S3 URL to notify CloudFormation about the code being run
    response=respond(event,context,status,responseData,None)

    #Function returns the response from the S3 URL
    return {
        "Response" :response
    }

def respond(event, context, responseStatus, responseData, physicalResourceId):
    #Build response payload required by CloudFormation
    responseBody = {}
    responseBody['Status'] = responseStatus
    responseBody['Reason'] = 'Details in: ' + context.log_stream_name
    responseBody['PhysicalResourceId'] = context.log_stream_name
    responseBody['StackId'] = event['StackId']
    responseBody['RequestId'] = event['RequestId']
    responseBody['LogicalResourceId'] = event['LogicalResourceId']
    responseBody['Data'] = responseData

    #Convert json object to string and log it
    json_responseBody = json.dumps(responseBody)
    log.info("Response body: " + str(json_responseBody))

    #Set response URL
    responseUrl = event['ResponseURL']

    #Set headers for preparation for a PUT
    headers = {
    'content-type' : '',
    'content-length' : str(len(json_responseBody))
    }

    #Return the response to the signed S3 URL
    try:
        response = requests.put(responseUrl,
        data=json_responseBody,
        headers=headers)
        log.info("Status code: " + str(response.reason))
        status="SUCCESS"
        return status
    #Defind what happens if the PUT operation fails
    except Exception as e:
        log.error("send(..) failed executing requests.put(..): " + str(e))
        status="FAILED"
        return status
As before, lets break down a few of the relevant sections of the code so you can see whats happening. To begin, lets look at the main lambda_handler. First we’ll initialize some of our variables and set our boto3 client to organizations so that we can create our accounts. After this, we’re going to set some variables in our Lambda function that will be passed in from our CloudFormation template (shown later in this post). After we set our variables, we’ll log them so that we can see what CloudFormation actually passed to our function.
#Main Lambda function to be excecuted
def lambda_handler(event, context):
    #Initialize the status of the function
    status="SUCCESS"
    responseData = {}
    client = boto3.client('organizations')

    #Read and log the input values
    acctName = event['ResourceProperties']['AccountName']
    ouName = event['ResourceProperties']['OUName']
    emailAddress = event['ResourceProperties']['Email']
    log.info("Account name is: " + acctName)
    log.info("Organizational Unit name is: " + ouName)
    log.info("Email Address is: " + emailAddress)
Next, we’ll use boto3 to create an Organizational Unit on the fly. We’ll pass in the name of this OU from our CloudFormation template. To do this we’ll use the create_organizational_unit method and we’ll need to pass in the parent OU and the name of our new OU. When we’re done, we’ll log the ID of this OU and I’m setting a variable with the ID of this OU as well for later on in the function.
    #create a new Organizational Unit
    orgResponse = client.create_organizational_unit(
        ParentId="ou-3hvv-jqwq89r0", #My Parent OU. Change for your environment
        Name=ouName
    )

    log.info(orgResponse['OrganizationalUnit']['Id'])
    OUID=str(orgResponse['OrganizationalUnit']['Id'])
Now that we’ve created an OU, lets create the account. Again, we’ll use boto3 to call the create_account method. We’ll pass in an email address to be used for the new account and an account name. Again, when this is done, we’ll log the response which is the account status. After this, we’ll initiate a loop to check on the status of the account while it’s being created. Account creation isn’t an immediate thing, so its good to check on it until its either Successful or Failed. The loop checks the status, logs it and waits until its no longer IN_PROGRESS.
    #Create a new Account in the OU Just Created
    acctResponse = client.create_account(
        Email=emailAddress,
        AccountName=acctName
    )

    #Check Account Status
    acctStatusID = acctResponse['CreateAccountStatus']['Id']
    log.info(acctStatusID)

    while True:
        createStatus = client.describe_create_account_status(
            CreateAccountRequestId=acctStatusID
        )
        log.info(createStatus['CreateAccountStatus']['State'])
        if str(createStatus['CreateAccountStatus']['State']) != 'IN_PROGRESS':
            newAccountId = str(createStatus['CreateAccountStatus']['AccountId'])
            break
With any luck, our account has been created and we’ve got one more thing to do. Lets move the new account, into the new OU we created. Again, we’ll use boto3, but this time with the move_account method. I’m passing in the new AccountId we stored from our new create_account method, and the OUID we stored from our create_organizational_unit. I’m also specifying my root OU which will be different in your case. Fill it in, or do a search to find it in the Lambda function.
    #Move Account to new OU
    moveResponse = client.move_account(
        AccountId=newAccountId,
        SourceParentId='r-3hvv', #My root OU. Change for your environment
        DestinationParentId=OUID
    )
The account stuff is done, now we’re just setting some return data to be sent back to CloudFormation. The info I want sent back to CFn as an output is the accountID of our new account we created. After which we’ll send the data back to our signed S3 URL as we explained in the previous post about Custom Resorces.
    #Set Return Data
    responseData = {"Message" : newAccountId} #If you need to return data use this json object

    #return the response back to the S3 URL to notify CloudFormation about the code being run
    response=respond(event,context,status,responseData,None)

    #Function returns the response from the S3 URL
    return {
        "Response" :response
    }
Create the CloudFormation Template
If you’re following from the previous post, the only changes to the CloudFormation template are the variables being passed back and forth. For that reason we won’t go into much detail here, but the full template I used is found below.
---
AWSTemplateFormatVersion: '2010-09-09'
Description: Account Creation Stack
Parameters:
  ModuleName: #Name of the Lambda Module
    Description: The name of the Python file
    Type: String
    Default: "create-account"
  S3Bucket: #S3 bucket in which to retrieve the python script with the Lambda handler
    Description: The name of the bucket that contains your packaged source
    Type: String
    Default: "hollow-acct"
  S3Key: #Name of the zip file
    Description: The name of the ZIP package
    Type: String
    Default: "create-account.zip"
  AccountName: #Account Name
    Description: Account Name To Be Created
    Type: String
    Default: "HollowTest1"
  OUName: #Organizational Unit Name
    Description: Organizational Unit Name To Be Created
    Type: String
    Default: "HollowTest1"
  Email: #Email Address
    Description: Email Address used for the Account
    Type: String
Resources:
  CreateAccount: #Custom Resource
    Type: Custom::CreateAccount
    Properties:
      ServiceToken:
        Fn::GetAtt:
        - TestFunction #Reference to Function to be run
        - Arn #ARN of the function to be run
      AccountName:
        Ref: AccountName
      OUName:
        Ref: OUName
      Email:
        Ref: Email
  TestFunction: #Lambda Function
    Type: AWS::Lambda::Function
    Properties:
      Code:
        S3Bucket:
          Ref: S3Bucket
        S3Key:
          Ref: S3Key
      Handler:
        Fn::Join:
        - ''
        - - Ref: ModuleName
          - ".lambda_handler"
      Role:
        Fn::GetAtt:
        - LambdaExecutionRole
        - Arn
      Runtime: python2.7
      Timeout: '30'
  LambdaExecutionRole: #IAM Role for Custom Resource
    Type: AWS::IAM::Role
    Properties:
      AssumeRolePolicyDocument:
        Version: '2012-10-17'
        Statement:
        - Effect: Allow
          Principal:
            Service:
            - lambda.amazonaws.com
          Action:
          - sts:AssumeRole
      Path: "/"
      Policies:
      - PolicyName: root
        PolicyDocument:
          Version: '2012-10-17'
          Statement:
          - Effect: Allow
            Action:
            - logs:CreateLogGroup
            - logs:CreateLogStream
            - logs:PutLogEvents
            Resource: arn:aws:logs:*:*:*
      - PolicyName: Acct
        PolicyDocument:
          Version: '2012-10-17'
          Statement:
          - Effect: Allow
            Action:
            - organizations:*
            Resource: "*"
Outputs: #Return output from the Lambda Function Run
  Message:
    Description: Message returned from Lambda
    Value:
      Fn::GetAtt:
      - CreateAccount #Output from the Custom Resource
      - Message #Return property
Results
Now that the coding is done, we can deploy the CloudFormation template. I’ve chosen to do this through the command line but you could do it through the console as well. My command line execution is as follows:
aws cloudformation create-stack --stack-name theITHollowCreateAccount1 --template-body file://create-account-CFn.yml --capabilities CAPABILITY_IAM --parameters ParameterKey=AccountName,ParameterValue=theITHollowAcct1 ParameterKey=OUName,ParameterValue=theITHollowOU1 ParameterKey=Email,[email protected] ParameterKey=ModuleName,ParameterValue=create-account ParameterKey=S3Bucket,ParameterValue=hollow-acct ParameterKey=S3Key,ParameterValue=create-account.zip

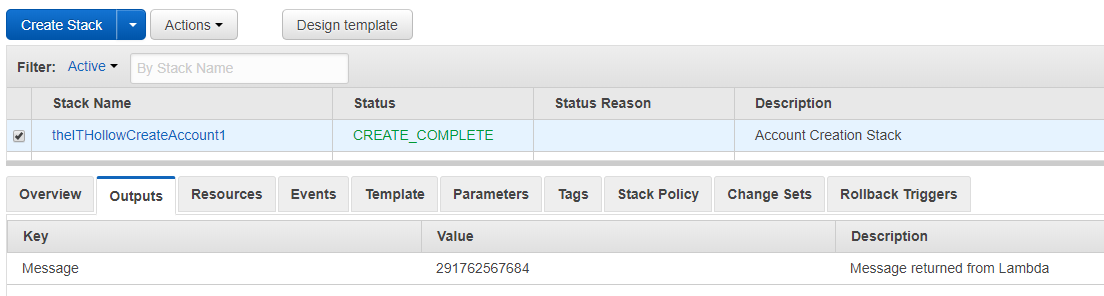
After a minute, you’ll see that the CFn stack has been deployed successfully, and that the output for the stack is the account number for the new AWS account.
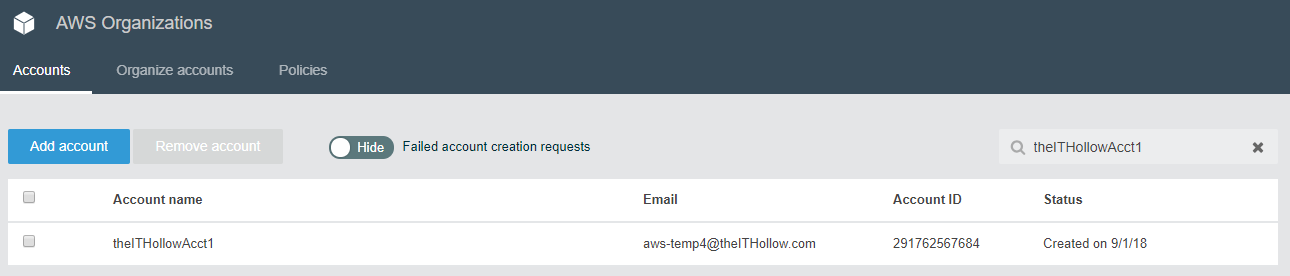
If we open up the AWS Organizations console, we’ll see that the new account was created and the account number matches our output from the screenshot above.
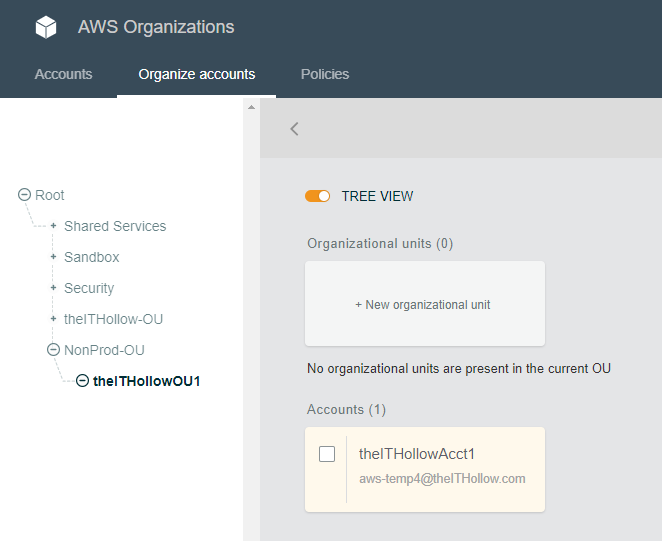
As we look through the organizational units, we’ll see that a new OU was created and that our new account lives within that OU.
Summary
I hope that this post has shown you what kind of cool stuff you can do with a CloudFormation custom resource. Now think how neat this might be to put in AWS Service Catalog to deploy new accounts on demand. I will admit that this method does have some drawbacks, such as not being able to delete the stack and have the account deleted, but it is what it is.