If you’ve been doing application development for long, having tools in place to check the health of your code is probably not a new concept. However, if you’re jumping into something like Cloud and you’ve been an infrastructure engineer, this may be a foreign concept to you. Isn’t it bad enough that you’ve started learning Git, JSON, YAML, APIs etc on top of your existing skill sets? Well, take some lessons from the application teams and you may well find that you’re improving your processes and reducing the technical debt and time to provision infrastructure as code resources as well.
We need to house our Infrastructure-as-Code (IaC) as part of a version control repository. Code in a file server isn’t going to cut it in the new world. Version control will be a great step, but how about we test our code after we make a new commit? How about we ensure the code is validated before we merge it to our release branch? How about we review our code to make sure that it is properly formatted so that everyone working on the code base is using the same techniques?
Overview
This post is a very basic solution to test your AWS CloudFormation templates after you commit them to your git repository. The diagram below shows what will be the pieces that are part of the build.
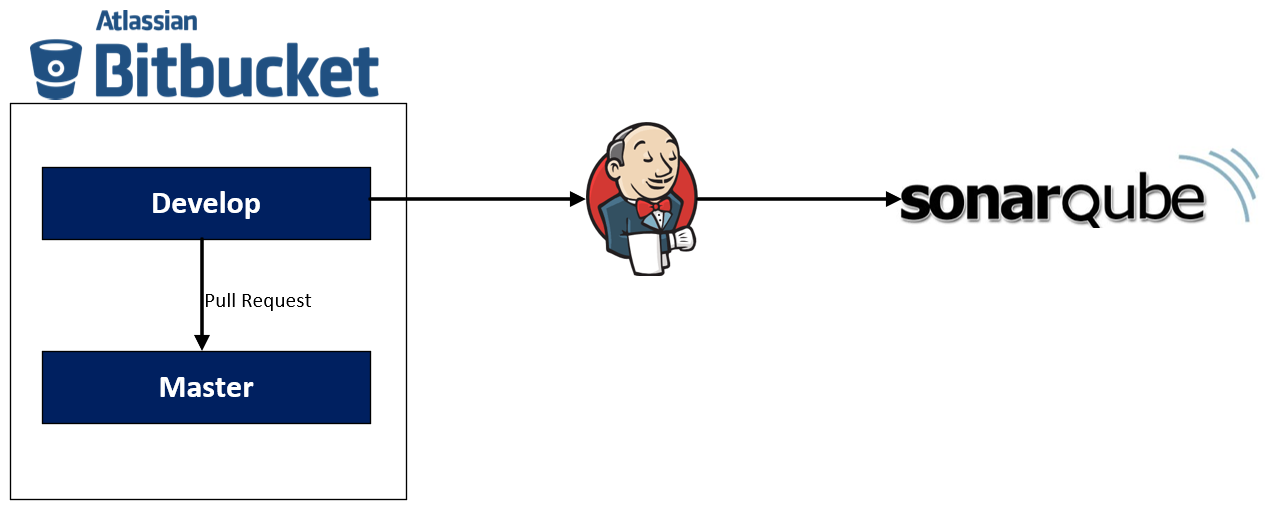
My code is stored in the Atlassian Bitbucket Cloud for source control. I’ll be making commits directly to the Develop branch for this post and when I’m satisfied with the outcomes, will merge it with the Master branch through a pull request and approval by an administrator. Before that happens, my code in the develop branch will be validated by a Jenkins server. Jenkins is going to perform two very basic tests just to make sure that the code is in working order.
The first test Jenkins will run is to execute the validate-template from the AWS CLI. This tests the code to make sure that it could run if I deployed it to AWS. The second test will be to lint the code through a plugin in SonarQube for YAML files. SonarQube community edition was used to get a view of how the code looks, or better said, “Smells”. SonarQube might not know if the template could be deployed to AWS, but it will shows us some information about the quality of the code that has been written.
Here is my Jenkisfile which triggers the builds. Again this is a very basic pipeline. The pieces in the “Code Review” stage are specific to the SonarQube setup including a login which I’m happy to share with you for this post. It won’t work if you try to use it.
pipeline {
    agent any

    stages {
        stage('CloudFormation Validate') {
            steps {
              script {
                if (env.BRANCH_NAME == 'develop')
                {
                  sh 'aws cloudformation validate-template --template-body file://./ec2sample.yml'
                }
              }
            }
        }
        stage('Code Review') {
            steps {
              script {
                if (env.BRANCH_NAME == 'develop')
                {
                  sh 'sonar-scanner \
                      -Dsonar.projectKey=SampleCFN \
                      -Dsonar.sources=. \
                      -Dsonar.host.url=http://sonarqube.hollow.local:9000 \
                      -Dsonar.login=7876126e70638d8e575eb2a892c41c5437ed20c6'
                }
              }
            }
        }
    }
}
The First Run
I took a very basic CloudFormation Template and ran it through my Jenkins pipeline. The CloudFormation template that I used is here for reference.
AWSTemplateFormatVersion: 2010-09-09
Description: Standard Template to Deploy EC2 Instances with proper tagging methodologies.

Metadata:

  AWS::CloudFormation::Interface:
    ParameterGroups:
      -
        Label:
          default: "AWS EC2 Instance"
        Parameters:
          - Ami
          - InstanceType
          - KeyPair
          - Subnet
          - SecurityGroup
          - SnapshotSchedule
          - SnapshotRetention
          - InstanceStartupTime
          - InstanceShutdownTime
      -
        Label:
          default: "AWS EC2 Tagging"
        Parameters:
          - Name
          - Account
          - Environment
          - Application
          - Role
          - CostCenter
          - BusinessUnit
          - Contact

Parameters:

  # EC2 Properties

  Ami:
    Type: String
    Description: Amazon Image Name to Deploy.
    AllowedValues:
      - Amazon-Linux
      - Amazon-Linux-2
      - Red-Hat-Enterprise-Linux-7.5
      - Ubuntu-16.04
      - Windows-Server-2016
      - Windows-Server-2012-r2

  InstanceType:
    Type: String
    Description: Instance size to be used by EC2 Instance
    AllowedValues:
      - t2.micro
      - t2.small
      - t2.medium
      - t2.large
      - m4.large
      - m4.xlarge
      - m4.2xlarge
      - m5.large
      - m5.xlarge
      - m5.2xlarge
      - c4.large
      - c4.xlarge
      - c5.large
      - c5.xlarge

  KeyPair:
    Type: AWS::EC2::KeyPair::KeyName
    Description: AWS EC2 Key Pair name for instance.

  Subnet:
    Type: AWS::EC2::Subnet::Id
    Description: Subnet to place EC2 Instance in.

  SecurityGroup:
    Type: AWS::EC2::SecurityGroup::Id
    Description: Security Group to add EC2 Instance to. Must be located in the same VPC as the Subnet.

  # EC2 Tagging

  Name:
    Type: String
    Description: EC2 Instance Name Tag.

  Account:
    Type: String
    Description: AWS Account Name for the EC2 instance.
    AllowedValues:
      - Production
      - Non-Production

  Environment:
    Type: String
    Description: AWS Environment for the EC2 instance.
    AllowedValues:
      - Production
      - Non-Production

  Application:
    Type: String
    Description: Application running on EC2 Instance.

  Role:
    Type: String
    Description: Roles running on EC2 Instance.

Mappings:

  # RegionMap maps AWS::Region in Us-East-1 format to a useable format for the Images mapping.
  RegionMap:
    us-east-1:
      "shortname": "useast1"
    us-east-2:
      "shortname": "useast2"
    us-west-1:
      "shortname": "uswest1"
    us-west-2:
      "shortname": "uswest2"

  # Latest Images as of 7/10
  Images:
    Amazon-Linux:
      "useast1": "ami-cfe4b2b0"
      "useast2": "ami-40142d25"
      "uswest1": "ami-0e86606d"
      "uswest2": "ami-0ad99772"
    Amazon-Linux-2:
      "useast1": "ami-b70554c8"
      "useast2": "ami-8c122be9"
      "uswest1": "ami-e0ba5c83"
      "uswest2": "ami-a9d09ed1"
    Red-Hat-Enterprise-Linux-7.5:
      "useast1": "ami-6871a115"
      "useast2": "ami-03291866"
      "uswest1": "ami-18726478"
      "uswest2": "ami-28e07e50"
    Ubuntu-16.04:
      "useast1": "ami-a4dc46db"
      "useast2": "ami-6a003c0f"
      "uswest1": "ami-8d948ced"
      "uswest2": "ami-db710fa3"
    Windows-Server-2016:
      "useast1": "ami-0327667c"
      "useast2": "ami-6a003c0f"
      "uswest1": "ami-b236d2d1"
      "uswest2": "ami-3703414f"
    Windows-Server-2012-r2:
      "useast1": "ami-b8f3b5c7"
      "useast2": "ami-da003ebf"
      "uswest1": "ami-832acee0"
      "uswest2": "ami-aeffbcd6"

Resources:

  AwsEc2Instance:
    Type: "AWS::EC2::Instance"
    Properties:
      ImageId: !FindInMap [ Images, !Ref Ami, !FindInMap [RegionMap, !Ref "AWS::Region", shortname ] ]
      InstanceType: !Ref InstanceType
      SecurityGroupIds:
        - !Ref SecurityGroup
      SubnetId: !Ref Subnet
      KeyName: !Ref KeyPair
      Tags:
        - Key: Name
          Value: !Ref Name
        - Key: Account
          Value: !Ref Account
        - Key: Environment
          Value: !Ref Environment
        - Key: Application
          Value: !Ref Application
        - Key: Role
          Value: !Ref Role

Outputs:

  Ec2Id:
    Value: !Ref AwsEc2Instance
    Description: AWS EC2 Instance ID

  Ec2PrivateIp:
    Value: !GetAtt AwsEc2Instance.PrivateIp
    Description: AWS EC2 Instance Private IP Address

  Ec2AvailabilityZone:
    Value: !GetAtt AwsEc2Instance.AvailabilityZone
    Description: AWS EC2 Instance Availability Zone
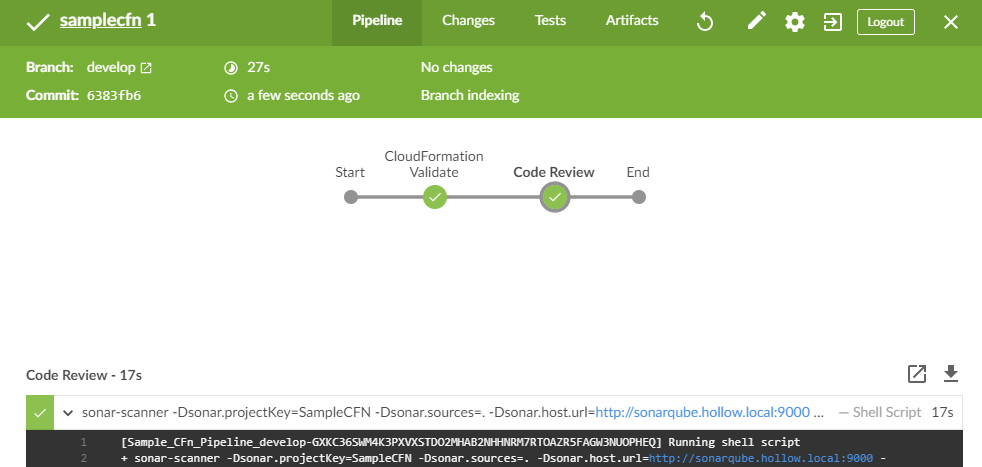
Through a Bitbucket web hook, my Jenkins server ran the newly commit code through my pipeline. First validating the CFn against the AWS CLI. Since it passed the first gate, the code was also then reviewed through SonarQube. If the first stage failed, the second stage wouldn’t run. This is by design to keep unnecessary processes from running. If your stage fails, all efforts to fix that code should be prioritized until its working again.
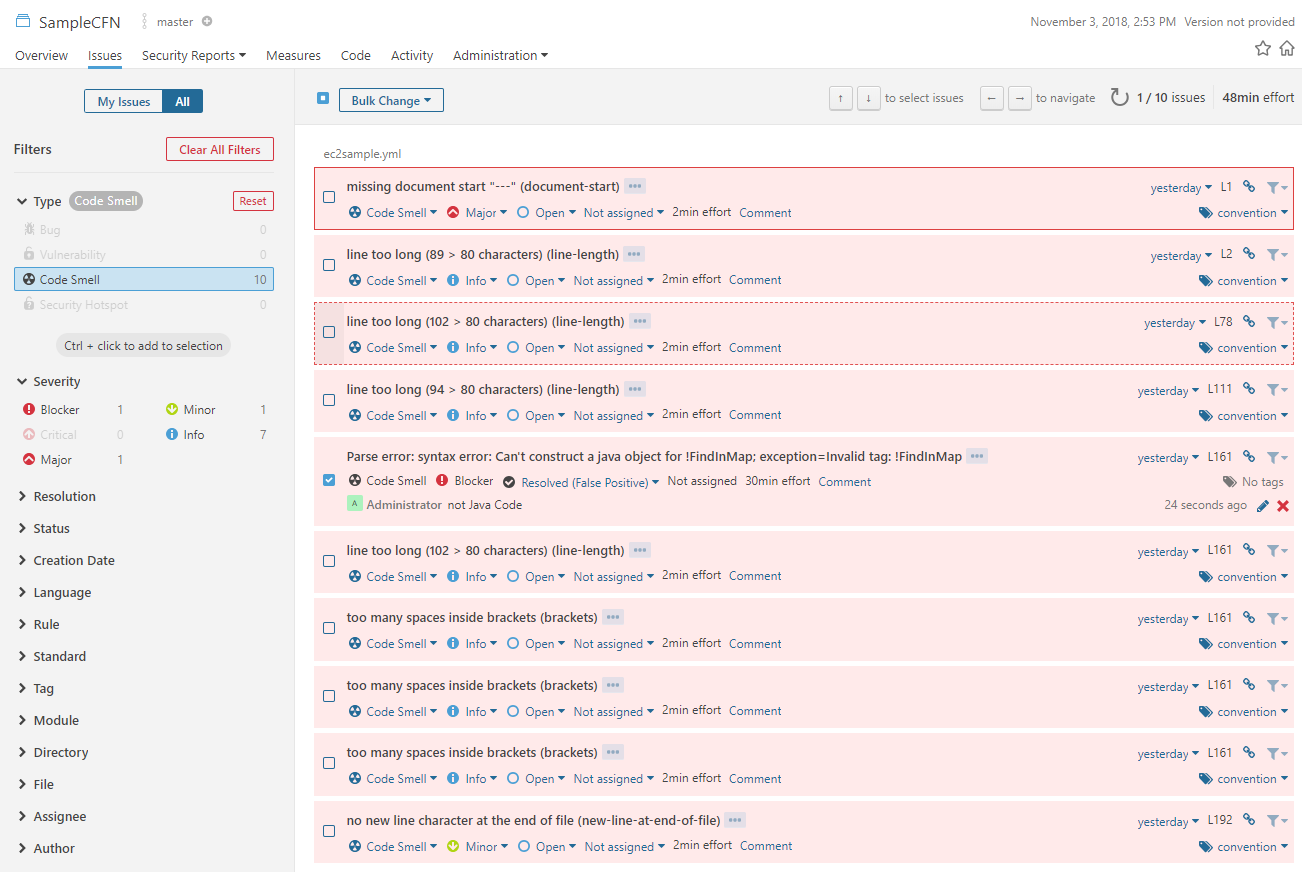
Obviously, I’m ecstatic that the code checked out, but now that it did, I can also take a peak in the SonarQube console to see how it did from a quality perspective. You can see from the screenshot below that there aren’t any bugs, or vulnerabilities, so thats great news. But if you look under “Code Smells” you’ll see that it believes that I have 48 mins of technical debt that I’ve acquired from this code. This comes from 10 “code smells”.

If I look into the code smells I’ll see which lines were causing the problem and why they were reported. This makes it pretty simple to go clean up my code and make it less stinky. Keeping a clean code base will make it much easier for a team to work on it since they’ll all be judged based on the same nose if you’ll pardon the analogy. Anytime anyone commits code, these tests can be run to see how poorly formatted that code is.
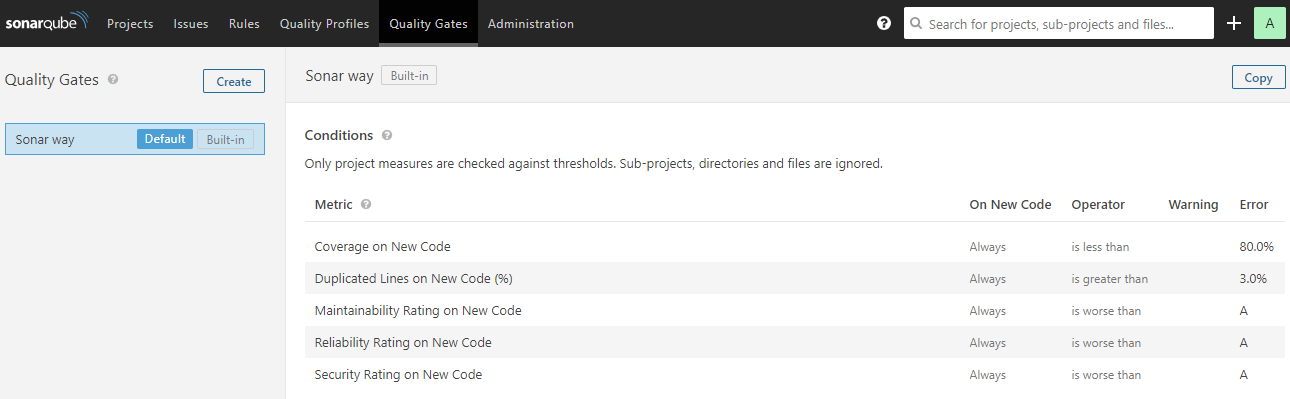
Whats better, is if the code smells really bad, a quality gate can be added to prevent the code from being merged to the bitbucket master branch. This takes some extra configuration which isn’t shown here but I’ve got an “A” rating here anyway. You can view the things that affect your quality gates in a different SonarQube tab. You can also create your own Quality Gates that match your own rules.
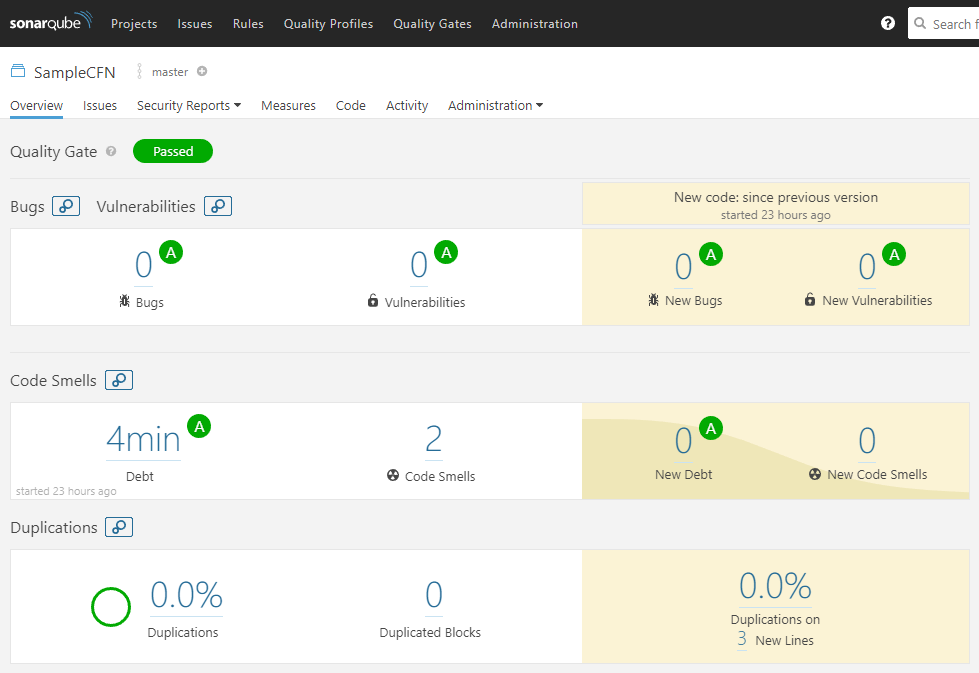
What’s Next
Well, I’ve got an “A” rating and you can see my “Quality Gate” shows passed so my code could be merged to my release branch, but that isn’t good enough. Lets cleanup that code and make is smell less. I ignored one of the recommendations from SonarQube since it was a false positive, and then I went in to update my code and re-commit it. I fixed all the issues but two lines that were longer than the SonarQube YAML plugin, which I’m ignoring. You can see that the second run only had 2 code smells and equals about 4 mins of technical debt.
I also went in and updated my code one more time and made a big oops (don’t worry, it was on purpose for this post) and of course it did not get through my validate test that was run on my Jenkins server. The result was that this code didn’t even go through the SonarQube tests, so they won’t show up.

Final Thoughts
The first step in moving to using Infrastructure as Code is to get that code into version control. If you’re serious about managing lots of code, its worth setting up a process to test that code for validity and quality. The more manual tasks related to testing your code, the more time you’re wasting on technical debt. Take the time with new builds to setup a framework where any code being updated will pass through some gates before released, and set it up so the process can be done automatically. If your IaC is broken, how successful will your application deploys be if they depend on it? It’s time to take a few lessons from the development teams and implement our own tool chain for infrastructure builds.