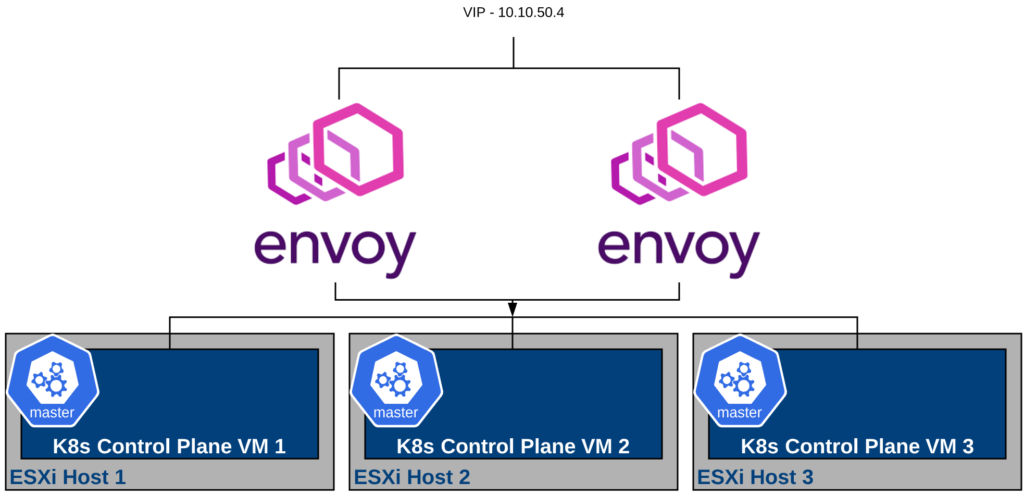
Recently I was tasked with setting up some virtual machines to be used as a load balancer for a Kubernetes cluster. The environment we were deploying our Kubernetes cluster didn’t have a load balancer available, so we thought we’d just throw some envoy proxies on some VMs to do the job. This post will show you how the following tasks were completed:
- Deploy Envoy on a pair of CentOS7 virtual machines.
- Configure Envoy with health checks for the Kubernetes Control Plane
- Install keepalived on both servers to manage failover.
- Configure keepalived to failover if a server goes offline, or the envoy service is not started.
Deploy Envoy
The first step will be to setup a pair of CentOS 7 servers. I’ve used virtual servers for this post, but baremetal would work the same. Also, similar steps could be used if you prefer debian as your linux flavor.
Once there is a working pair of servers, its time to install envoy.
sudo yum install -y yum-utils
sudo yum-config-manager --add-repo https://getenvoy.io/linux/centos/tetrate-getenvoy.repo
sudo yum install -y getenvoy-envoy
Once the Envoy bits are installed, we should create a configuration file that tells envoy how to load balance across our Kubernetes control plane nodes and set health checks to make sure it is routed appropriately. Be sure to update this file with your own ports, and server names/IP Addresses before deploying.
cat <<EOF > /root/config
static_resources:
  listeners:
  - name: main
    address:
      socket_address:
        address: 0.0.0.0
        port_value: 6443 #Kubernetes Default Port
    filter_chains:
    - filters:
      - name: envoy.tcp_proxy
        config:
          stat_prefix: ingress_tcp
          cluster: k8s

  clusters:
  - name: k8s
    connect_timeout: 0.25s
    type: strict_dns # static
    lb_policy: round_robin
    hosts:
    - socket_address:
        address: k8s-controller-0.hollow.local #replace with k8s control plane node name
        port_value: 6443 #Kubernetes Default Port
    - socket_address:
        address: k8s-controller-1.hollow.local #replace with k8s control plane node name
        port_value: 6443 #Kubernetes Default Port
    - socket_address:
        address: k8s-controller-2.hollow.local #replace with k8s control plane node name
        port_value: 6443 #Kubernetes Default Port
    health_checks:
    - timeout: 1s
      interval: 5s
      unhealthy_threshold: 1
      healthy_threshold: 1
      http_health_check:
        path: "/healthz"

admin:
  access_log_path: "/dev/null"
  address:
    socket_address:
      address: 0.0.0.0
      port_value: 8001
EOF
Next, let’s setup a systemd service so that it will start on boot and restart if it crashes.
cat < /etc/systemd/system/envoy.service
> [Unit]
> Description=Envoy Proxy
> After=network.target
> StartLimitIntervalSec=0
>
> [Service]
> Type=simple
> Restart=always
> RestartSec=1
> User=root
> ExecStart=/usr/bin/envoy -c /root/config.yaml
>
> [Install]
> WantedBy=multi-user.target
> EOF
Lastly, we can enable and start the service.
sudo systemctl start envoy
sudo systemctl enable envoy
Make Envoy Highly Available
At this point of the post, you should have two virtual machines with Envoy installed and able to distribute traffic to your Kubernetes control plane nodes. Either one of them should work. But what we’d really like to have is a single IP Address (Virtual IP Address - VIP) that can float between these two envoy nodes depending on which one is healthy. To do this, we’ll use the keepalived project.
The first step will be to install keepalived on both envoy nodes.
sudo yum install keepalived
Keepalived will ensure that whichever node is healthy, will own the VIP. But having a healthy node now also includes having the envoy process we created is in a running status. To ensure that our service is running, we need to create our own script. The script is very simple and just gathers the process id of our envoy service. If it can’t get a process id, the script will fail, and keepalived will note this error to manage failover.
cat <<EOF > /usr/local/bin/envoycheck.sh
pidof envoy
EOF
Our service will run that script as root, and for security reasons ONLY the root user should have access to execute or modify this script. So we need to change permissions. NOTE: if anyone other than root has access keepalived service will skip this check so be sure to set the permissions correctly.
sudo chmod 700 /usr/local/bin/envoycheck.sh
Now, we need to set the keepalived configurations on each of the nodes. Pick a node and deploy the following keepalived configuration to /etc/keepalived/keepalived.conf which overwrites the existing configuration.
Node1
! Configuration File for keepalived

global_defs {
   enable_script_security
   script_user root
}

vrrp_script chk_envoy {
  script       "/usr/local/bin/envoycheck.sh" #Our custom health check
  interval 2   # check every 2 seconds
}

vrrp_instance VI_1 {
    state MASTER
    interface ens192  #REPLACE WITH YOUR NETWORK INTERFACE
    virtual_router_id 51
    priority 101 #PRIORITY
    unicast_src_ip 10.10.50.2 #IP Address of this server
    unicast_peer {
        10.10.50.3 #IP Address of the secondary server
    advert_int 1
    authentication {
        auth_type PASS
        auth_pass MYPASSWORD #PASSWORD
    }
    virtual_ipaddress {
        10.10.50.4  ####SHARED IP ADDRESS - VIP
    }

    track_script {
        chk_envoy
    }
}
When you’re done with the first node, create a similar config file on the second node.
Node2
! Configuration File for keepalived

global_defs {
   enable_script_security
   script_user root
}

vrrp_script chk_envoy {
  script       "/usr/local/bin/envoycheck.sh" #Our custom health check
  interval 2   # check every 2 seconds
}

vrrp_instance VI_1 {
    state MASTER
    interface ens192  #REPLACE WITH YOUR NETWORK INTERFACE
    virtual_router_id 51
    priority 100 . #PRIORITY - DIFFERENT FROM HOST 1
    unicast_src_ip 10.10.50.3 #IP ADDRESS OF THIS HOST
    unicast_peer {
        10.10.50.2 #IP Address of the first node
    advert_int 1
    authentication {
        auth_type PASS
        auth_pass MYPASSWORD . #PASSWORD - SAME AS HOST 1
    }
    virtual_ipaddress {
        10.10.50.4  ####SHARED IP ADDRESS - VIP - SAME AS HOST1
    }

    track_script {
        chk_envoy
    }
}
Now we should be ready to go. Start and enable the service for keepalived.
sudo service keepalived start
chkconfig keepalived on
Test failover
You may not have a Kubernetes cluster setup yet for a full test, but we can at least see if our envoy server will failover to the other node. To do this you can look at the messages to see which keepalived node is advertising gratuitous arp commands in order to own the VIPs.
tailf /var/log/messages

If you’re looking at the standby envoy node, the messages will state that the service is in a BACKUP STATE.

If you want to test the failover, stop the envoy service and see if the node in a backup state starts sending gratuitous arps to takeover the VIP.
Summary
A virtual load balancer could be handy in a lot of situations. This case called for a way to distribute load to my Kubernetes control plane nodes, but could really be used for anything. First deploy envoy and configure it to distribute load to the upstream services providing the appropriate health checks. Then use keepalived to ensure that a VIP floats between the healthy envoy nodes. What will you use this option to do? Post your configs in the comments.