I really wanted to test out some VMware Site Recovery Manager scenarios and realized that buying SANs, servers and networking equipment was quite expensive. I also didn’t have a lot of space in my house that was available for running all of this equipment. After completing my VCP5 I was given a copy of VMware Workstation 8 and thought that I might be able to build a nested virtual environment, where the ESXi hosts themselves were virtualized inside of workstation. (Don’t worry, virtualizing a virtual host doesn’t warp time or space, it’s safe.)
Physical Hardware
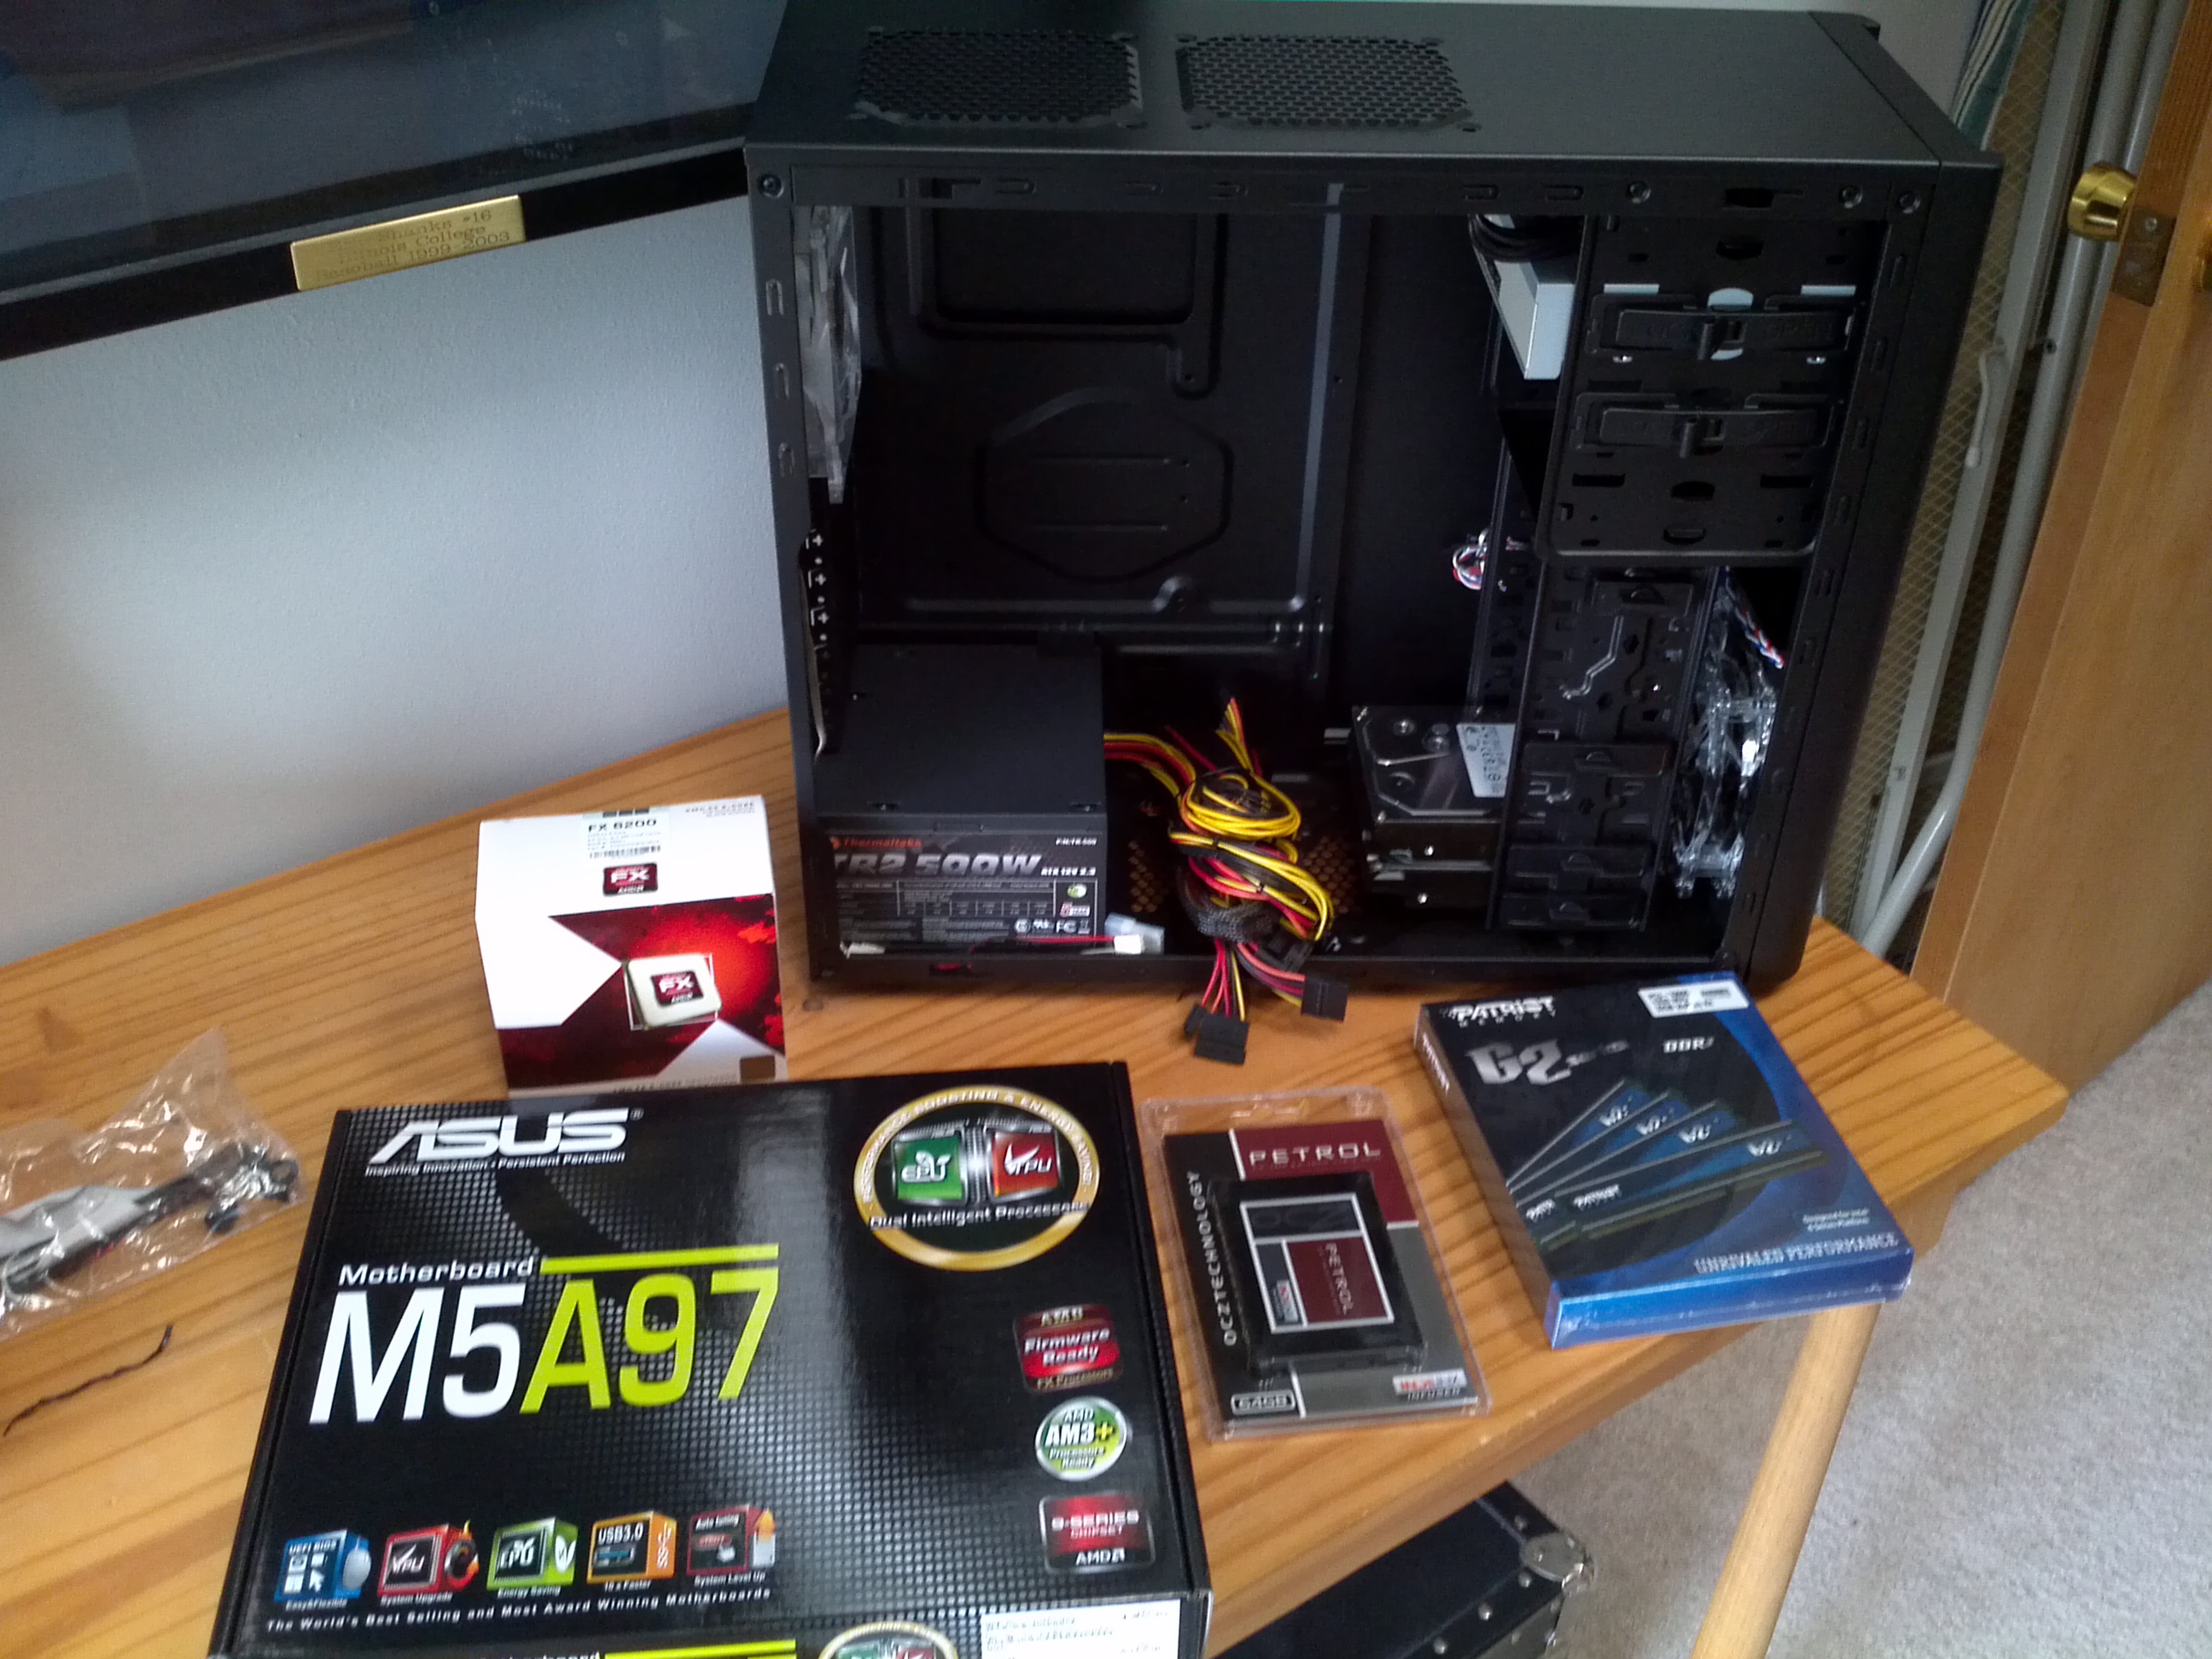
For my whitebox, I knew that the thing I would run shortest on was memory. Nesting hosts, SAN simulators, and VMs was going to take a toll on my resources, so I got a machine that would run 32Gb of RAM and I also purchased an SSD drive for anything I wanted better performance on. I also purchased two 2Tb drives (mirrored) in the server and a six core AMD processor. My hardware is listed below:
- 1 x Patriot Gamer 2 Series, Division 2 Edition 32GB (4 x 8GB) 240-Pin DDR3 SDRAM DDR3 1333 (PC3 10666) Desktop Memory Model PGD332G1333ELQK
- 1 x ASUS M5A97 AM3+ AMD 970 SATA 6Gb/s USB 3.0 ATX AMD Motherboard with UEFI BIOS
- 1 x OCZ Petrol PTL1-25SAT3-64G 2.5" 64GB SATA III MLC Internal Solid State Drive (SSD)
- 1 x AMD FX-6200 Zambezi 3.8GHz (4.1GHz Turbo) Socket AM3+ 125W Six-Core Desktop Processor FD6200FRGUBOX
- 2x Seagate Barracuda Green ST2000DL003 2TB 5900 RPM Sata 6.0Gb/s b3.5" Internal Hard Drive - Bare Drive
Logical Design
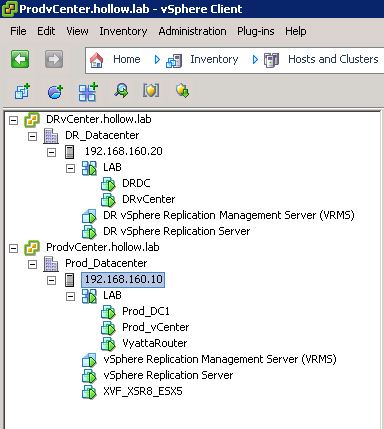
To give you a better picture of the nesting that is happening, I’ve drawn up a picture. Here you can see that I only have 1 physical machine running a Microsoft Server OS with Workstation installed. Inside of that we have ESXi hosts setup, and inside of those we have our “virtual machines.”
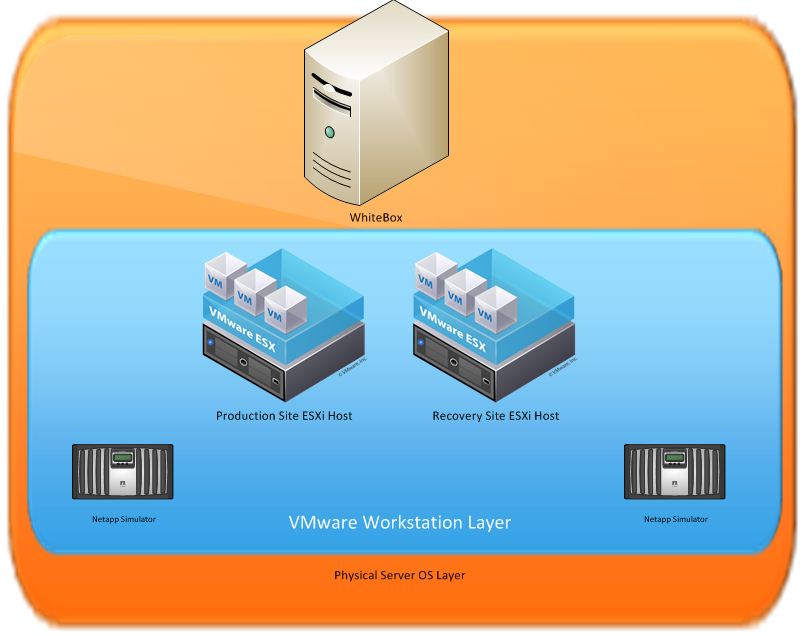
I know that the picture seems pretty convoluted, and I’ll admit that having a lab setup this way is slightly more difficult to wrap your head around, but it sure beats spending the dough on extra equipment.
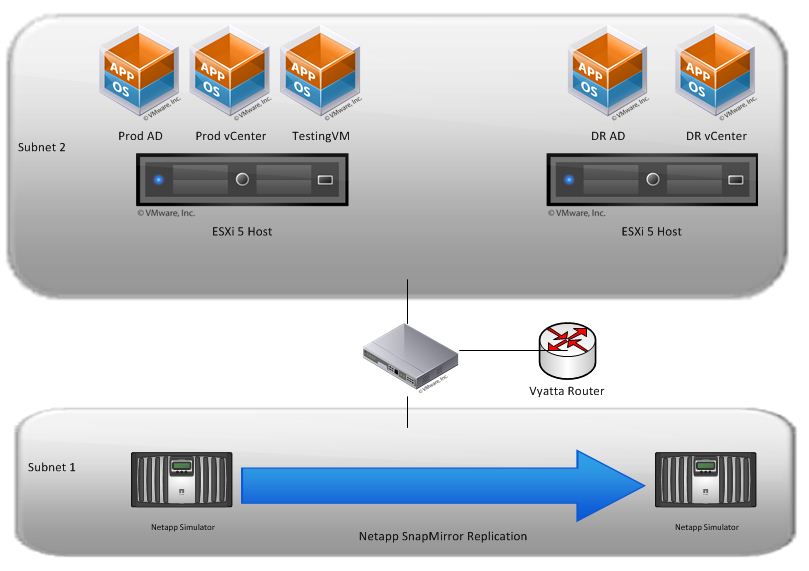
In an effort to give you a better look at the actual lab environment, the below diagram shows the SRM part that I would be using to test SRM. Here you can see that I’ve stripped out all of the VMware Workstation layers, and the physical hardware in order to simplify what I want to test.
Setup
In order to get all of this setup, you should give yourself plenty of time. It took me somewhere around 2 weeks of working in my spare time to get it up and running fully. If you’re considering building a lab of your own, hopefully these tips will help you get going faster.
First and foremost I need to thank Vargi for his great documentation on setting this up. Following his SRM in a box guide was great and is likely everything you need to get your lab up and running. I would just like to point out a few places where I got stuck so that this doesn’t happen to future users. His guide can be found here: https://docs.google.com/file/d/0B8RhOQcmJhZuMThjNWU5OWEtMGE3Ni00ODdkLTlkYzEtMTBjYTllMjE0OWZh/edit?pli=1#
and I recommend checking out his blog at: http://virtual-vargi.blogspot.com/
Netapp Simulators Setup
I had plenty of problems getting the Netapp Simulators setup correctly. Everything that you need to know is in the SRM in a Box setup guide, but be sure to follow these commands exactly, the first time you boot up the Simulator. If you boot the simulator to OnTap without changing this info you’re done. You’ll need to get another copy of the simulator from the Now.netapp.com site and start over. Also, be sure that when you’re setting up the sysid and serial numbers of your two simulators, that they are different so that OnCommand System Manager can then manage both systems. I’ve copied Vargi’s text below for quick reference.
Boot Simulator for initial and do its initial configuration. We need to change the serial number as we are going to have two simulators running and managed by OnCommand System Manager. When it boots press a key other than enter to break the boot, and then run the following commands.
set bootarg.nvram.sysid=1111111101
set SYS_SERIAL_NUM=1111111101
boot
I would also like to mention that this all works perfectly fine with the 8.1 version of the Netapp Simulator.
ESXi FIX for BSOD
I was excited to see that ESXi was now supported in Workstation 8, after all that’s why I decided to build this in the first place. But I quickly started getting BSODs on my system and I assumed that I had purchased some faulty hardware in my whitebox. After some digging, I found that the fix was to make a setting change on the ESXi guest. (you have to love the VMware communities) http://communities.vmware.com/message/2017526
It appears as though this will be resolved in a future version of workstation and the “fix” won’t be necessary any longer.
Multiple Subnets
I wasn’t sure that it was necessary, but for a more realistic feel I wanted to have more than one subnet available. In my case I have a storage subnet and a virtual machineESXi host subnet. Unfortunately, I didn’t want to have my SRM Lab interfere with my home network. Luckily Vyatta has a free virtual router that you can use to route traffic between multiple subnets. This allowed me to build additional networks as needed and can communicate with them as needed. I have another post related to setting up the Vyatta Router. Vyatta Router Setup
End Results